프론트엔드, 백엔드 서버 무중단 배포
📌 개요
프론트엔드, 백엔드 서버 배포의 전반적인 프로세스를 살펴보자.
📌 도메인 DNS 설정
도메인을 구매하여 배포된 서버의 도메인과 매핑해보자.
DNSZi
DNSZi는 네임서버를 관리해주는 사이트이다. 접속 후 회원가입을 한다.
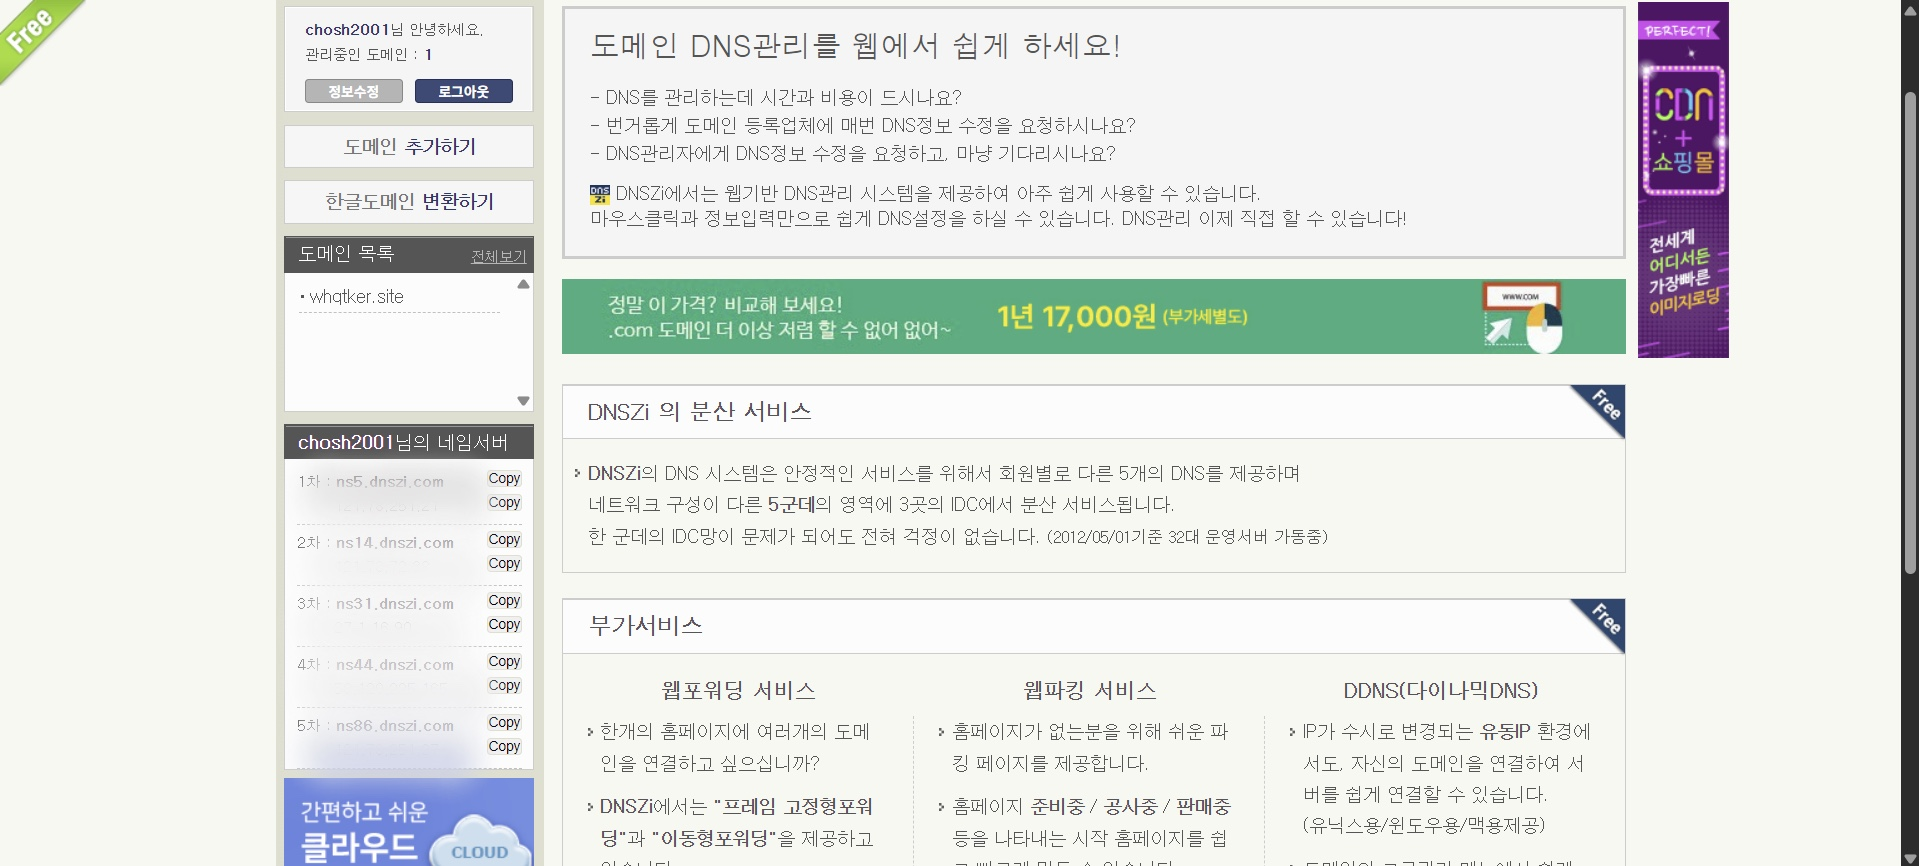
좌측에서 본인의 네임서버를 확인할 수 있다.
도메인 구매
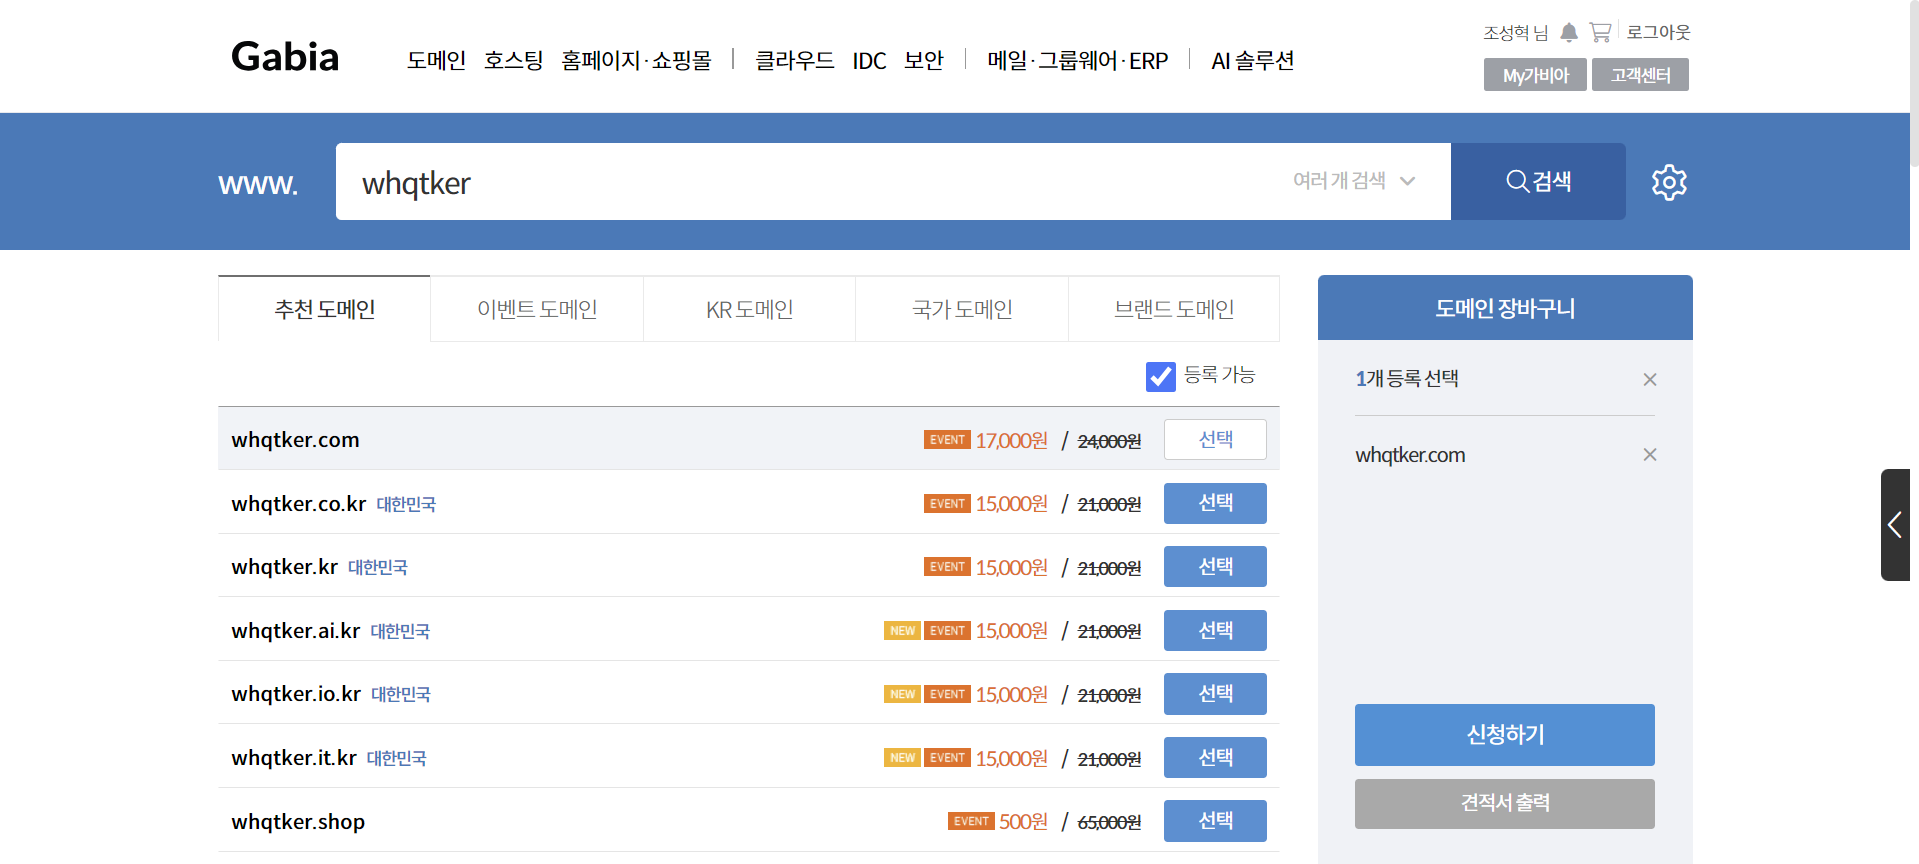
가비아에 접속하여 회원가입 후 원하는 도메인을 입력하면 구매 가능한 도메인을 볼 수 있다. 적절한 도메인을 선택하여 구매한다. ‘신청하기’ 버튼을 클릭한다.
도메인은 오른쪽부터 계층이 높아진다. 예를 들이 www.whqtker.com에서 ‘com’은 1차 도메인, ‘whqtker’은 2차 도메인, ‘www’는 3차 도메인이다.
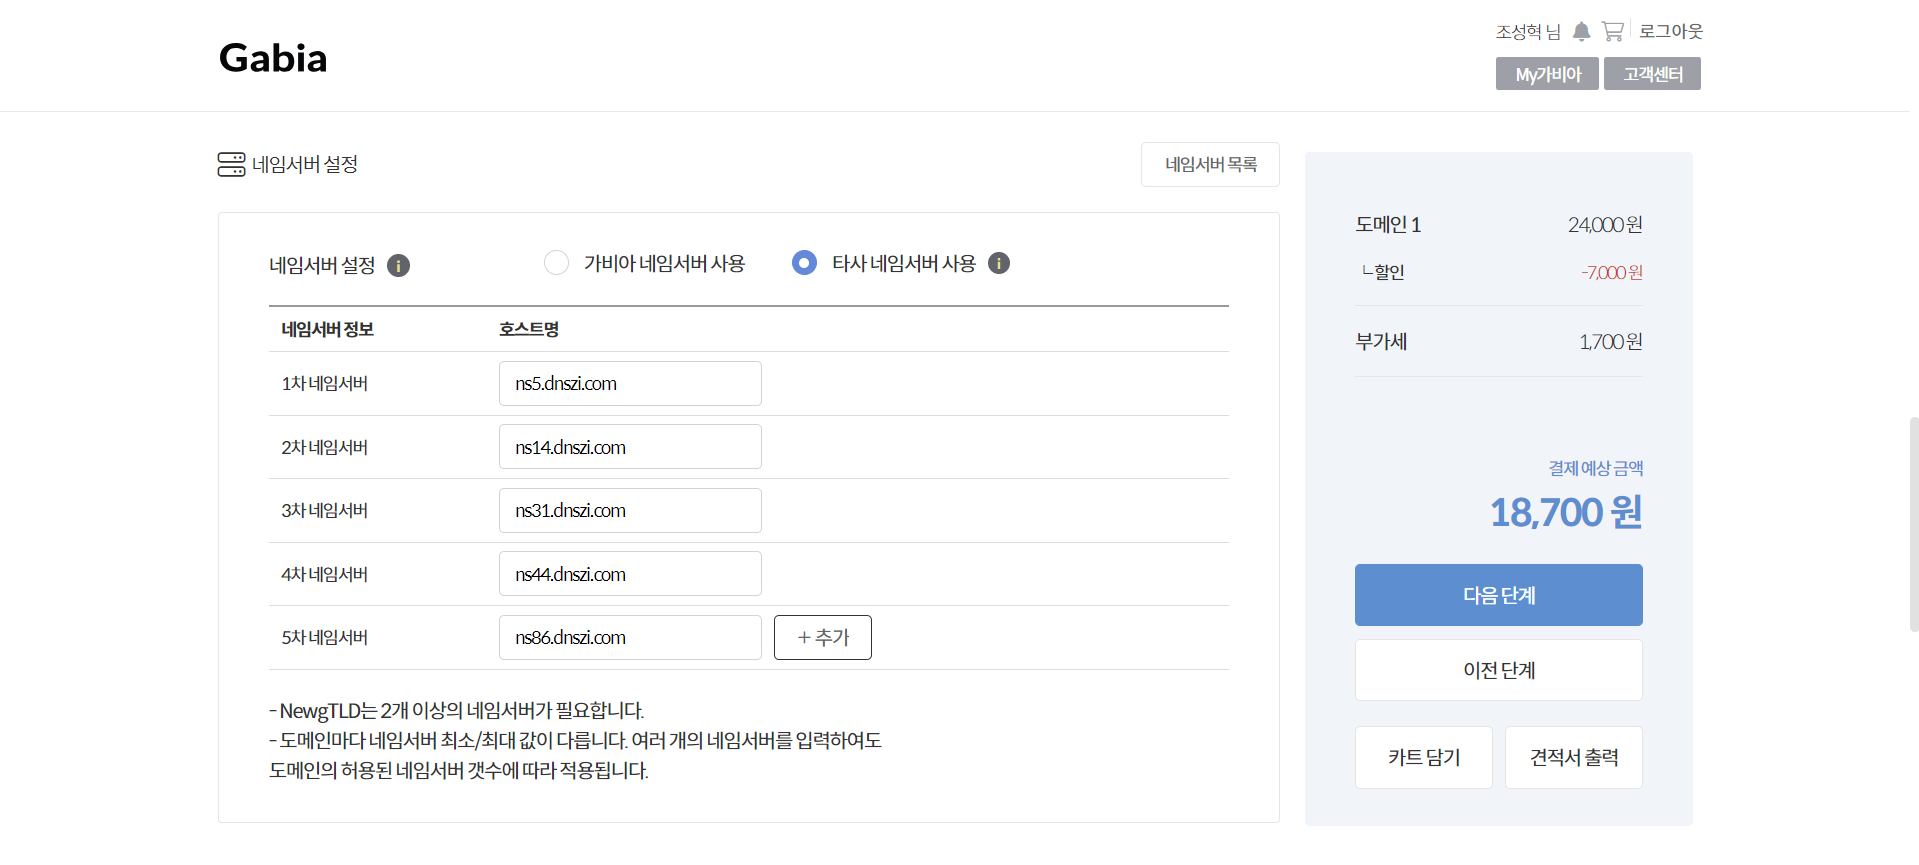
‘타사 네임서버 사용’을 선택하고 DNSZi의 네임서버를 등록한다. 이후 계속 진행한다.
📌 프론트엔드 배포
프론트엔드 레포지토리는 생성되었다고 가정한다.
vercel에 접속한다.
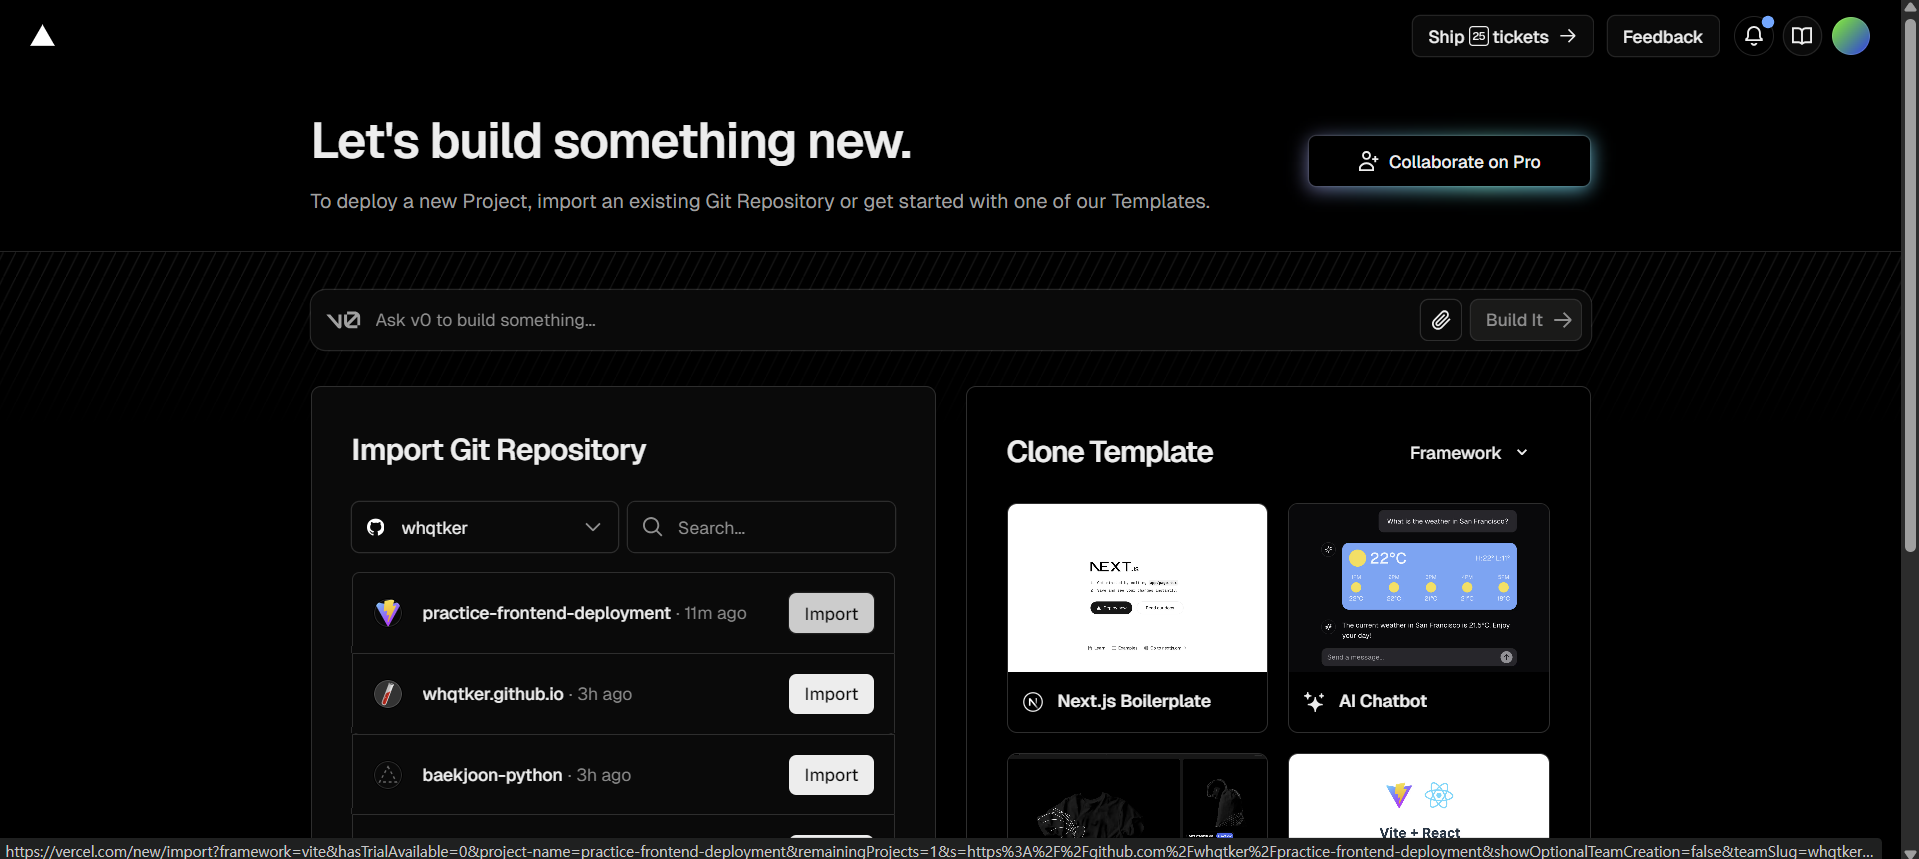
배포할 레포지토리를 선택한다.
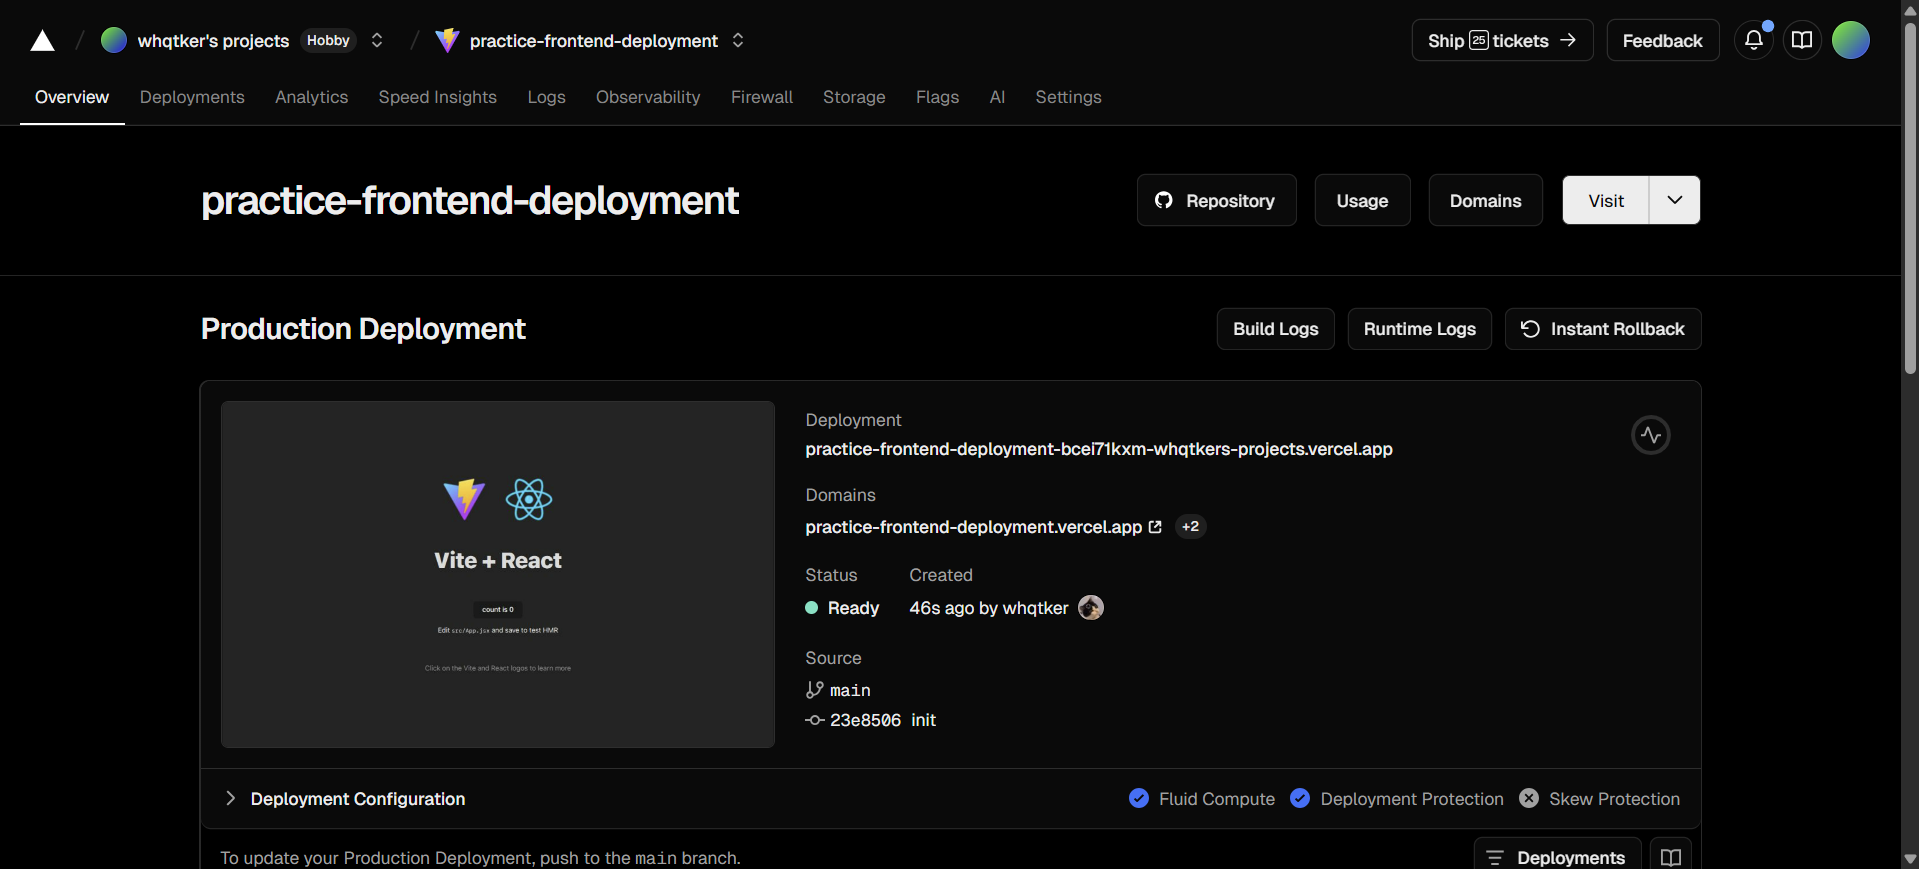
배포가 완료된 후 화면이며, 도메인 또한 생성되었다.
CNAME을 통해 도메인 주소를 변경해보자.
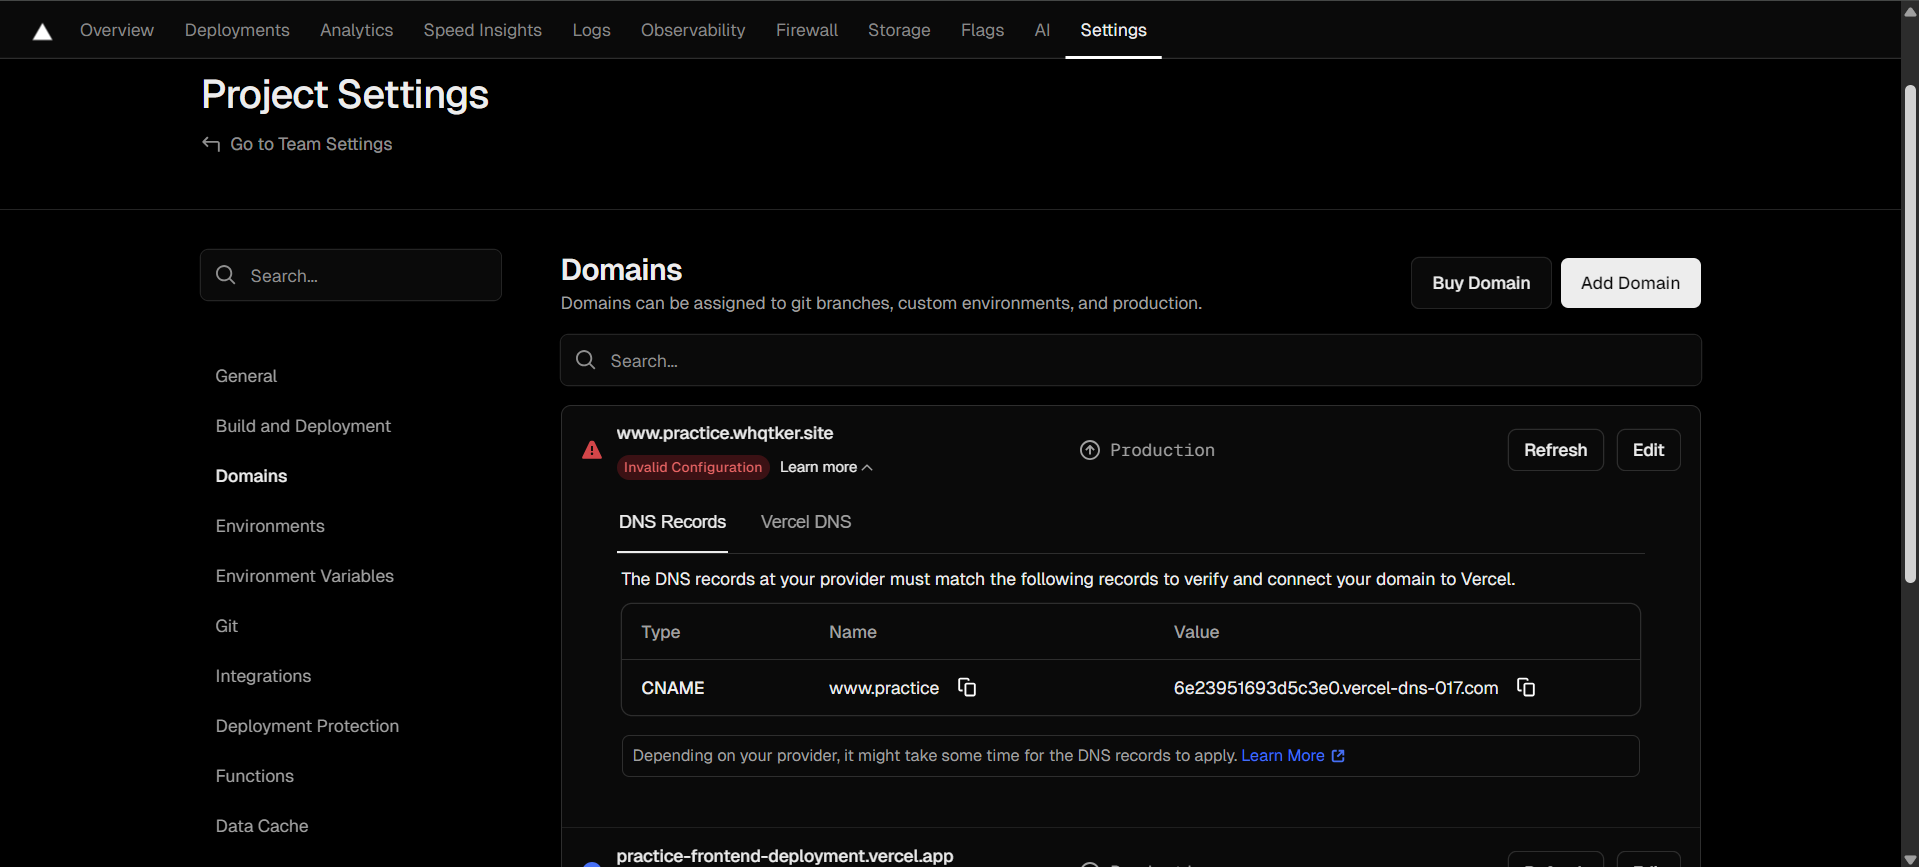
Settings - Domains 탭에 들어와서 Add Domain 버튼을 클릭하여 원하는 도메인을 입력한다. 입력하게 되면 에러가 발생하게 되는데, vercel에서 제공하는 목적지 도메인을 복사하여 DNSZi에서 CNAME을 등록해야 한다.
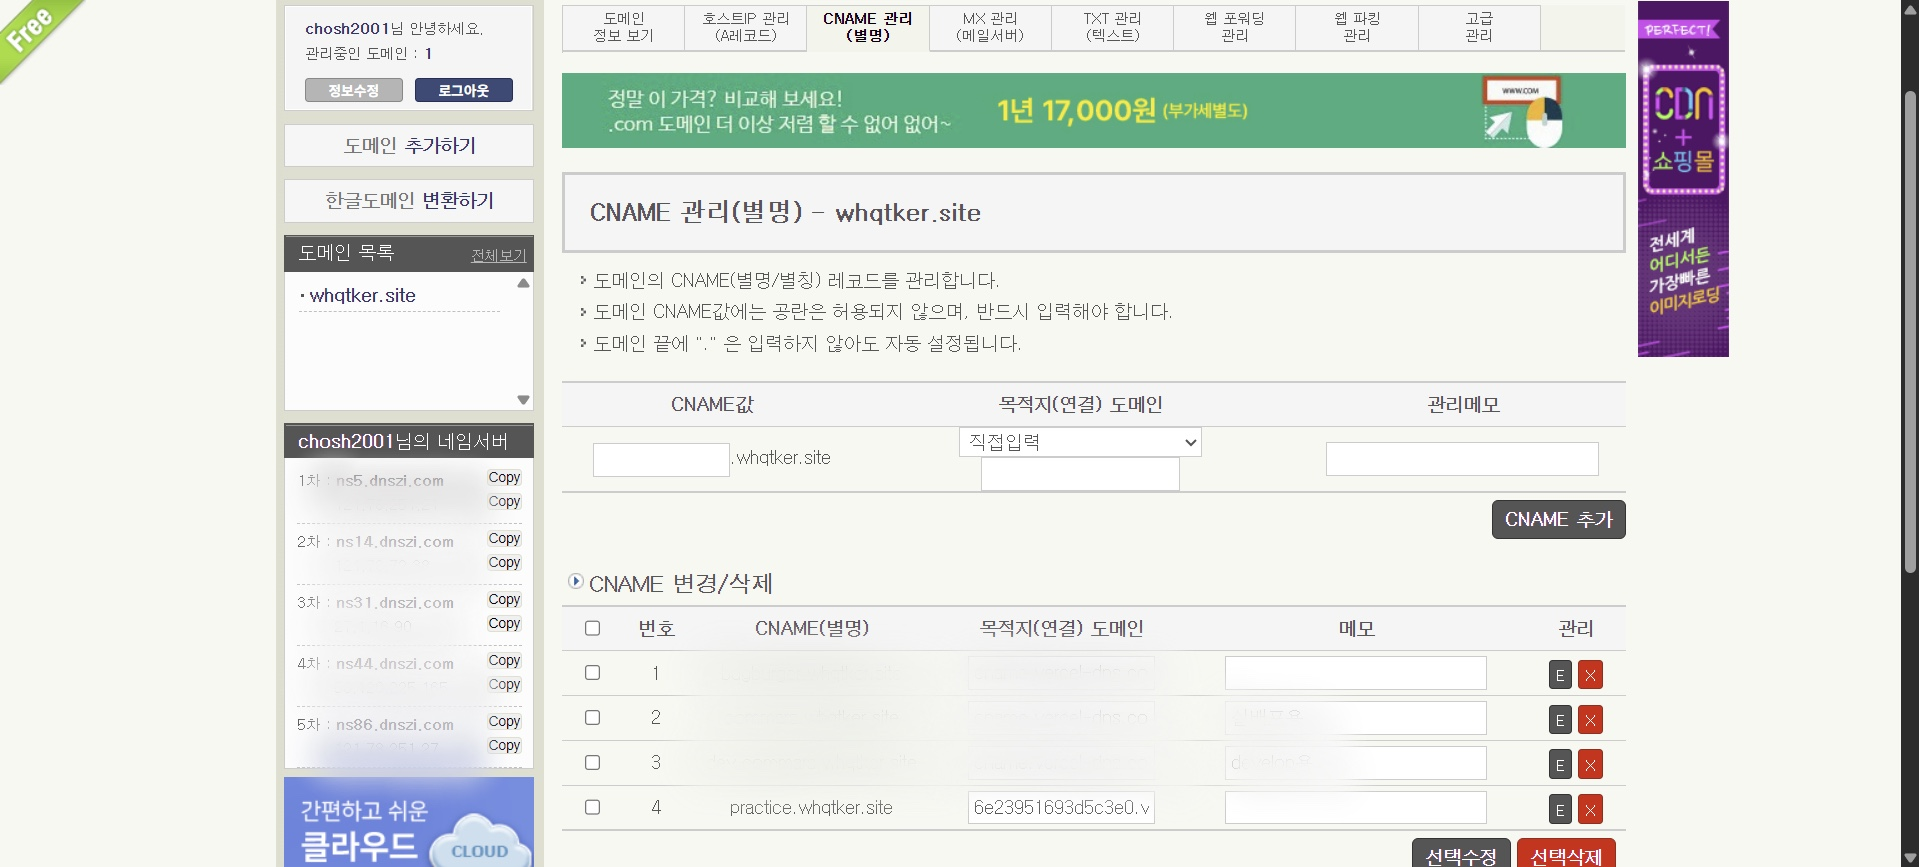
CNAME과 복사한 목적지 도메인을 등록한다.
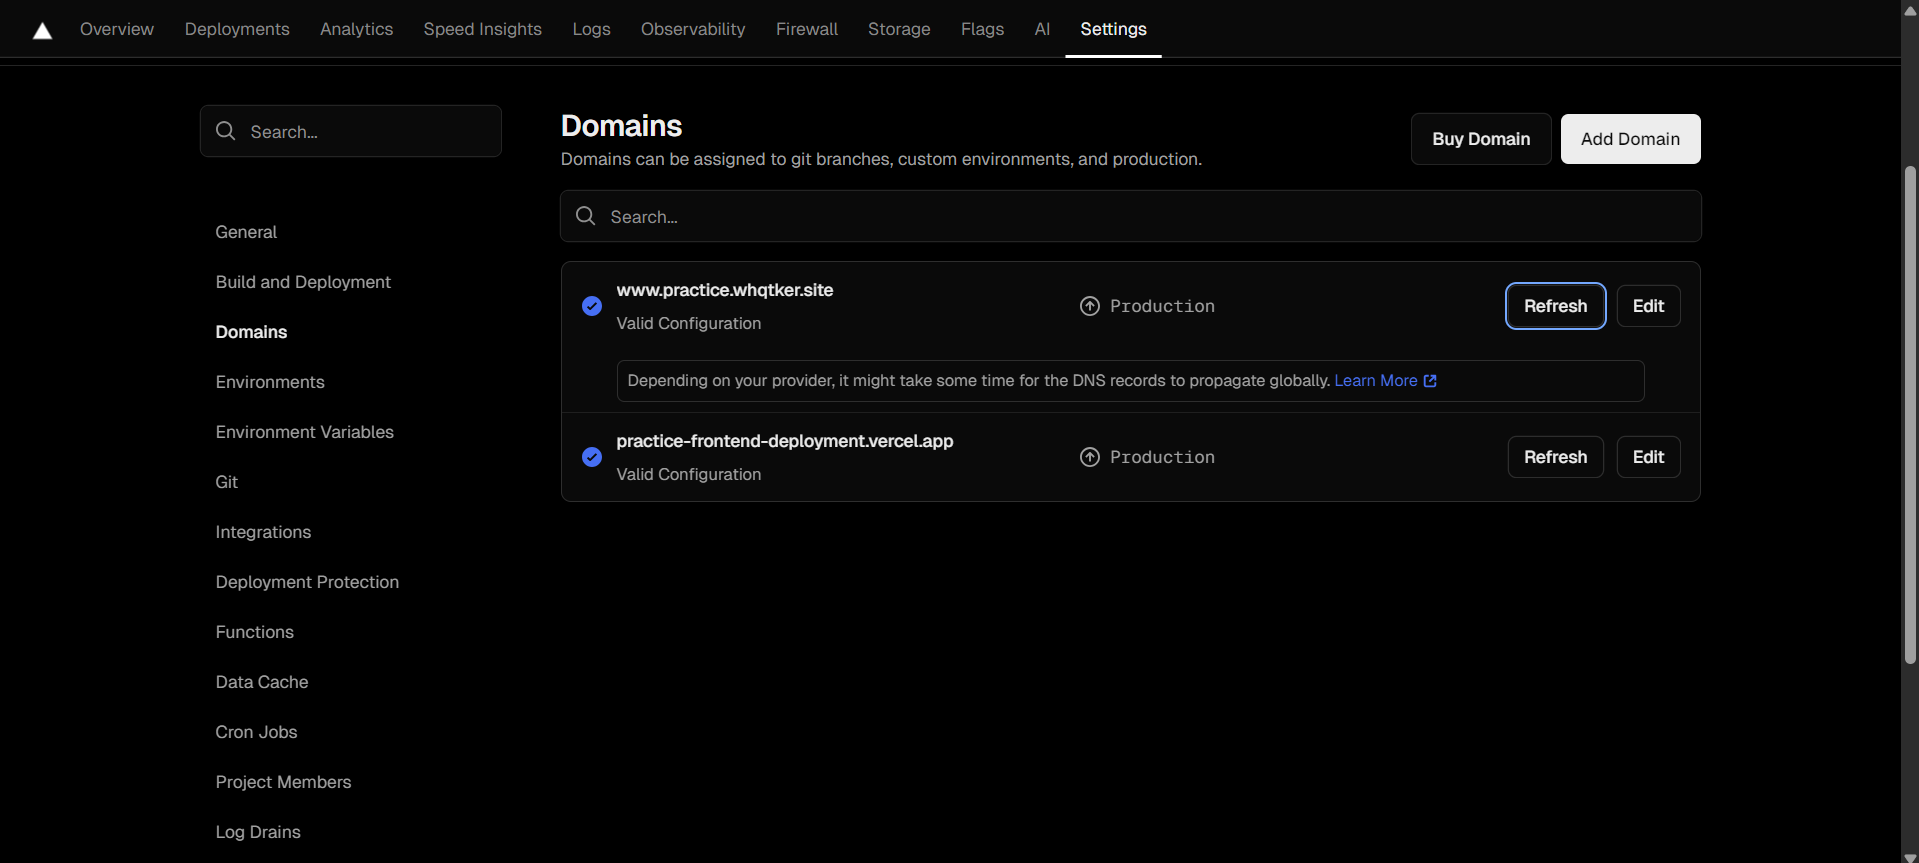
등록 후 조금 기다리면 등록한 CNAME으로 접속이 가능하다.
📌 백엔드 배포
Terraform 을 사용하여 AWS 리소스를 생성하고 socat 을 통한 포트 포워딩으로 Blue Green 배포 를 구현해보자.
AWS 리소스 생성
1
2
3
4
5
6
7
8
9
10
11
12
13
14
15
16
17
18
19
20
21
22
23
24
25
26
27
28
29
30
31
32
33
34
35
36
37
38
39
40
41
42
43
44
45
46
47
48
49
50
51
52
53
54
55
56
57
58
59
60
61
62
63
64
65
66
67
68
69
70
71
72
73
74
75
76
77
78
79
80
81
82
83
84
85
86
87
88
89
90
91
92
93
94
95
96
97
98
99
100
101
102
103
104
105
106
107
108
109
110
111
112
113
114
115
116
117
118
119
120
121
122
123
124
125
126
127
128
129
130
131
132
133
134
135
136
137
138
139
140
141
142
143
144
145
146
147
148
149
150
151
152
153
154
155
156
157
158
159
160
161
162
163
164
165
166
167
168
169
170
171
172
173
174
175
176
177
178
179
180
181
182
183
184
185
186
187
188
189
190
191
192
193
194
195
196
terraform {
  required_providers {
    aws = {
      source  = "hashicorp/aws"
      version = "~> 4.0"
    }
  }
}

provider "aws" {
  region = var.region
}

resource "aws_vpc" "vpc_1" {
  cidr_block = "10.0.0.0/16"

  enable_dns_support = true
  enable_dns_hostnames = true

  tags = {
    Name = "${var.prefix}-vpc-1"
  }
}

resource "aws_subnet" "subnet_1" {
  vpc_id                  = aws_vpc.vpc_1.id
  cidr_block              = "10.0.1.0/24"
  availability_zone       = "${var.region}a"
  map_public_ip_on_launch = true

  tags = {
    Name = "${var.prefix}-subnet-1"
  }
}

resource "aws_subnet" "subnet_2" {
  vpc_id                  = aws_vpc.vpc_1.id
  cidr_block              = "10.0.2.0/24"
  availability_zone       = "${var.region}b"
  map_public_ip_on_launch = true

  tags = {
    Name = "${var.prefix}-subnet-2"
  }
}

resource "aws_subnet" "subnet_3" {
  vpc_id                  = aws_vpc.vpc_1.id
  cidr_block              = "10.0.3.0/24"
  availability_zone       = "${var.region}c"
  map_public_ip_on_launch = true

  tags = {
    Name = "${var.prefix}-subnet-3"
  }
}

resource "aws_internet_gateway" "igw_1" {
  vpc_id = aws_vpc.vpc_1.id

  tags = {
    Name = "${var.prefix}-igw-1"
  }
}

resource "aws_route_table" "rt_1" {
  vpc_id = aws_vpc.vpc_1.id

  route {
    cidr_block = "0.0.0.0/0"
    gateway_id = aws_internet_gateway.igw_1.id
  }

  tags = {
    Name = "${var.prefix}-rt-1"
  }
}

resource "aws_route_table_association" "association_1" {
  subnet_id      = aws_subnet.subnet_1.id
  route_table_id = aws_route_table.rt_1.id
}

resource "aws_route_table_association" "association_2" {
  subnet_id      = aws_subnet.subnet_2.id
  route_table_id = aws_route_table.rt_1.id
}

resource "aws_route_table_association" "association_3" {
  subnet_id      = aws_subnet.subnet_3.id
  route_table_id = aws_route_table.rt_1.id
}

resource "aws_security_group" "sg_1" {
  name = "${var.prefix}-sg-1"

  ingress {
    from_port   = 0
    to_port     = 0
    protocol    = "all"
    cidr_blocks = ["0.0.0.0/0"]
  }

  egress {
    from_port   = 0
    to_port     = 0
    protocol    = "all"
    cidr_blocks = ["0.0.0.0/0"]
  }

  vpc_id = aws_vpc.vpc_1.id

  tags = {
    Name = "${var.prefix}-sg-1"
  }
}

resource "aws_iam_role" "ec2_role_1" {
  name = "${var.prefix}-ec2-role-1"

  assume_role_policy = <<EOF
  {
    "Version": "2012-10-17",
    "Statement": [
      {
        "Sid": "",
        "Action": "sts:AssumeRole",
        "Principal": {
            "Service": "ec2.amazonaws.com"
        },
        "Effect": "Allow"
      }
    ]
  }
  EOF
}

resource "aws_iam_role_policy_attachment" "s3_full_access" {
  role       = aws_iam_role.ec2_role_1.name
  policy_arn = "arn:aws:iam::aws:policy/AmazonS3FullAccess"
}

resource "aws_iam_role_policy_attachment" "ec2_ssm" {
  role       = aws_iam_role.ec2_role_1.name
  policy_arn = "arn:aws:iam::aws:policy/service-role/AmazonEC2RoleforSSM"
}

resource "aws_iam_instance_profile" "instance_profile_1" {
  name = "${var.prefix}-instance-profile-1"
  role = aws_iam_role.ec2_role_1.name
}

locals {
  ec2_user_data_base = <<-END_OF_FILE
#!/bin/bash
yum install docker -y
systemctl enable docker
systemctl start docker

curl -L https://github.com/docker/compose/releases/latest/download/docker-compose-$(uname -s)-$(uname -m) -o /usr/local/bin/docker-compose
chmod +x /usr/local/bin/docker-compose

yum install git -y

sudo dd if=/dev/zero of=/swapfile bs=128M count=32
sudo chmod 600 /swapfile
sudo mkswap /swapfile
sudo swapon /swapfile
sudo swapon -s
sudo sh -c 'echo "/swapfile swap swap defaults 0 0" >> /etc/fstab'

END_OF_FILE
}

resource "aws_instance" "ec2_1" {
  ami = "ami-04c596dcf23eb98d8"
  instance_type = "t2.micro"
  subnet_id = aws_subnet.subnet_1.id
  vpc_security_group_ids = [aws_security_group.sg_1.id]
  associate_public_ip_address = true

  iam_instance_profile = aws_iam_instance_profile.instance_profile_1.name

  tags = {
    Name = "${var.prefix}-ec2-1"
  }

  root_block_device {
    volume_type = "gp3"
    volume_size = 30
  }

  user_data = <<-EOF
${local.ec2_user_data_base}
EOF
}
1
2
3
4
5
6
7
8
9
terraform {
  required_providers {
    aws = {
      source  = "hashicorp/aws"
      version = "~> 4.0"
    }
  }
}
Terraform을 실행하기 위한 AWS 프로바이더를 정의한다.
1
2
3
provider "aws" {
  region = var.region
}
리소스가 생성될 AWS 리전을 설정한다.
1
2
3
4
5
6
7
resource "aws_vpc" "vpc_1" {
  cidr_block = "10.0.0.0/16"
  enable_dns_support = true
  enable_dns_hostnames = true
  tags = { Name = "${var.prefix}-vpc-1" }
}
VPC를 생성한다.
1
2
3
4
5
6
7
8
9
10
11
12
13
14
15
16
17
18
19
20
21
22
23
24
25
26
27
28
29
30
31
32
resource "aws_subnet" "subnet_1" {
  vpc_id                  = aws_vpc.vpc_1.id
  cidr_block              = "10.0.1.0/24"
  availability_zone       = "${var.region}a"
  map_public_ip_on_launch = true

  tags = {
    Name = "${var.prefix}-subnet-1"
  }
}

resource "aws_subnet" "subnet_2" {
  vpc_id                  = aws_vpc.vpc_1.id
  cidr_block              = "10.0.2.0/24"
  availability_zone       = "${var.region}b"
  map_public_ip_on_launch = true

  tags = {
    Name = "${var.prefix}-subnet-2"
  }
}

resource "aws_subnet" "subnet_3" {
  vpc_id                  = aws_vpc.vpc_1.id
  cidr_block              = "10.0.3.0/24"
  availability_zone       = "${var.region}c"
  map_public_ip_on_launch = true

  tags = {
    Name = "${var.prefix}-subnet-3"
  }
}
3개의 서브넷을 생성한다.
1
2
3
4
resource "aws_internet_gateway" "igw_1" {
  vpc_id = aws_vpc.vpc_1.id
}
인터넷 게이트웨이를 설정한다.
1
2
3
4
5
6
7
8
resource "aws_route_table" "rt_1" {
  vpc_id = aws_vpc.vpc_1.id
  route {
    cidr_block = "0.0.0.0/0"
    gateway_id = aws_internet_gateway.igw_1.id
  }
}
라우팅 테이블을 정의한다. 모든 외부 트래픽을 인터넷 게이트웨이로 라우팅한다.
1
2
3
4
5
6
7
8
9
10
11
12
13
14
resource "aws_route_table_association" "association_1" {
  subnet_id      = aws_subnet.subnet_1.id
  route_table_id = aws_route_table.rt_1.id
}

resource "aws_route_table_association" "association_2" {
  subnet_id      = aws_subnet.subnet_2.id
  route_table_id = aws_route_table.rt_1.id
}

resource "aws_route_table_association" "association_3" {
  subnet_id      = aws_subnet.subnet_3.id
  route_table_id = aws_route_table.rt_1.id
}
생성한 서브넷을 라우팅 테이블에 연결한다.
1
2
3
4
5
6
7
8
9
10
11
12
13
14
15
16
17
resource "aws_security_group" "sg_1" {
  name = "${var.prefix}-sg-1"
  ingress {
    from_port = 0
    to_port = 0
    protocol = "all"
    cidr_blocks = ["0.0.0.0/0"]
  }
  egress {
    from_port = 0
    to_port = 0
    protocol = "all"
    cidr_blocks = ["0.0.0.0/0"]
  }
  vpc_id = aws_vpc.vpc_1.id
}
보안 그룹을 정의한다. 모든 인/아웃바운드 트래픽을 허용한다.
1
2
3
4
5
6
7
8
9
10
11
12
13
14
15
16
resource "aws_iam_role" "ec2_role_1" {
  name = "${var.prefix}-ec2-role-1"
  assume_role_policy = <<EOF
  {
    "Version": "2012-10-17",
    "Statement": [
      {
        "Action": "sts:AssumeRole",
        "Principal": { "Service": "ec2.amazonaws.com" },
        "Effect": "Allow"
      }
    ]
  }
  EOF
}
EC2 인스턴스가 다른 AWS 서비스에 접근할 수 있는 권한을 정의한다.
1
2
3
4
5
6
7
8
9
10
resource "aws_iam_role_policy_attachment" "s3_full_access" {
  role = aws_iam_role.ec2_role_1.name
  policy_arn = "arn:aws:iam::aws:policy/AmazonS3FullAccess"
}

resource "aws_iam_role_policy_attachment" "ec2_ssm" {
  role = aws_iam_role.ec2_role_1.name
  policy_arn = "arn:aws:iam::aws:policy/service-role/AmazonEC2RoleforSSM"
}
EC2 인스턴스가 S3에 대한 모든 권한을 갖도록 하며, AWS SSM 기능을 활성화한다.
1
2
3
4
5
resource "aws_iam_instance_profile" "instance_profile_1" {
  name = "${var.prefix}-instance-profile-1"
  role = aws_iam_role.ec2_role_1.name
}
IAM role을 EC2 인스턴스에 연결한다.
1
2
3
4
5
6
7
8
9
10
11
12
13
14
15
16
17
18
19
20
21
locals {
  ec2_user_data_base = <<-END_OF_FILE
#!/bin/bash
yum install docker -y
systemctl enable docker
systemctl start docker

curl -L https://github.com/docker/compose/releases/latest/download/docker-compose-$(uname -s)-$(uname -m) -o /usr/local/bin/docker-compose
chmod +x /usr/local/bin/docker-compose

yum install git -y

sudo dd if=/dev/zero of=/swapfile bs=128M count=32
sudo chmod 600 /swapfile
sudo mkswap /swapfile
sudo swapon /swapfile
sudo swapon -s
sudo sh -c 'echo "/swapfile swap swap defaults 0 0" >> /etc/fstab'

END_OF_FILE
}
EC2 인스턴스가 부팅될 때 실행될 스크립트를 정의한다. Docker, Docker Compose, Git을 설치하고 4GB 스왑 파일을 생성한다.
1
2
3
4
5
6
7
8
9
10
11
12
13
14
15
16
17
18
resource "aws_instance" "ec2_1" {
  ami = "ami-04c596dcf23eb98d8"
  instance_type = "t2.micro"
  subnet_id = aws_subnet.subnet_1.id
  vpc_security_group_ids = [aws_security_group.sg_1.id]
  associate_public_ip_address = true
  iam_instance_profile = aws_iam_instance_profile.instance_profile_1.name

  root_block_device {
    volume_type = "gp3"
    volume_size = 30
  }

  user_data = <<-EOF
${local.ec2_user_data_base}
EOF
}
생성할 EC2 인스턴스를 정의한다.
1
2
3
4
5
6
7
8
9
10
11
12
13
14
variable "prefix" {
  description = "Prefix for all resources"
  default     = "dev"
}

variable "region" {
  description = "region"
  default     = "ap-northeast-2"
}

variable "nickname" {
  description = "nickname"
  default     = "whqtker"
}
1
2
3
4
5
variable "prefix" {
  description = "Prefix for all resources"
  default     = "dev"
}
prefix 블록은 모든 리소스 이름 앞에 붙는 접두사로, 기본값을 ‘dev’로 설정한다.
1
2
3
4
5
variable "region" {
  description = "region"
  default     = "ap-northeast-2"
}
region 블록은 AWS 리전을 지정하는 데 사용된다.
1
2
3
4
5
variable "nickname" {
  description = "nickname"
  default     = "whqtker"
}
nickname 블록은 사용자 닉네임을 저장하는 데 사용된다.
terraform apply 를 통해 리소스를 생성한다.
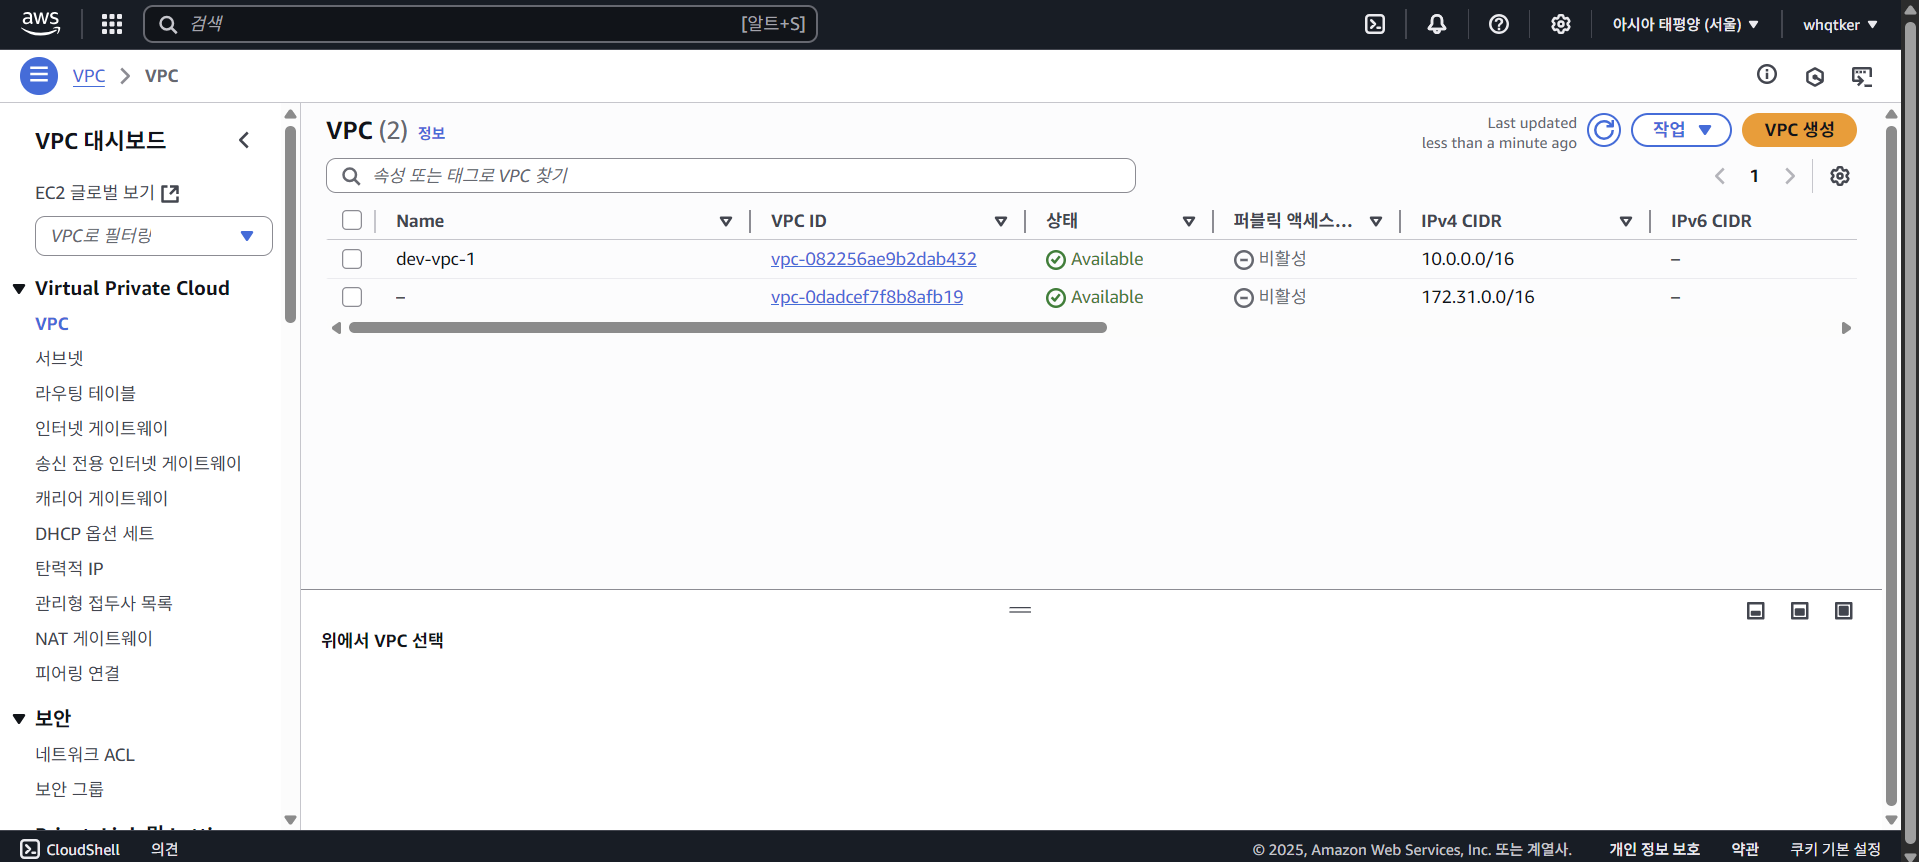
AWS 대시보드에서 생성된 리소스를 확인할 수 있다.
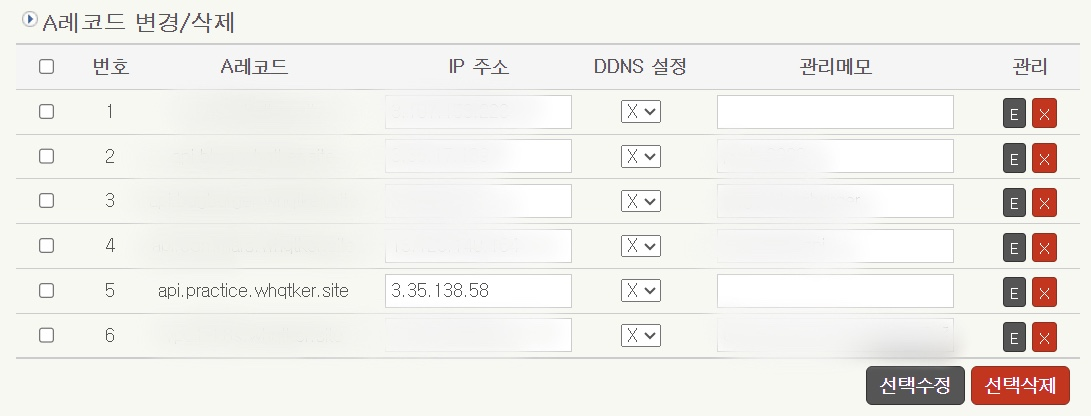
DNSZi에서 생성된 EC2의 퍼블릭 IP 주소로 A레코드를 설정한다.
도커의 깃허브 접근 권한 설정
도커기 ghcr.io 의 이미지를 pull 할 수 있도록 권한을 설정하자.
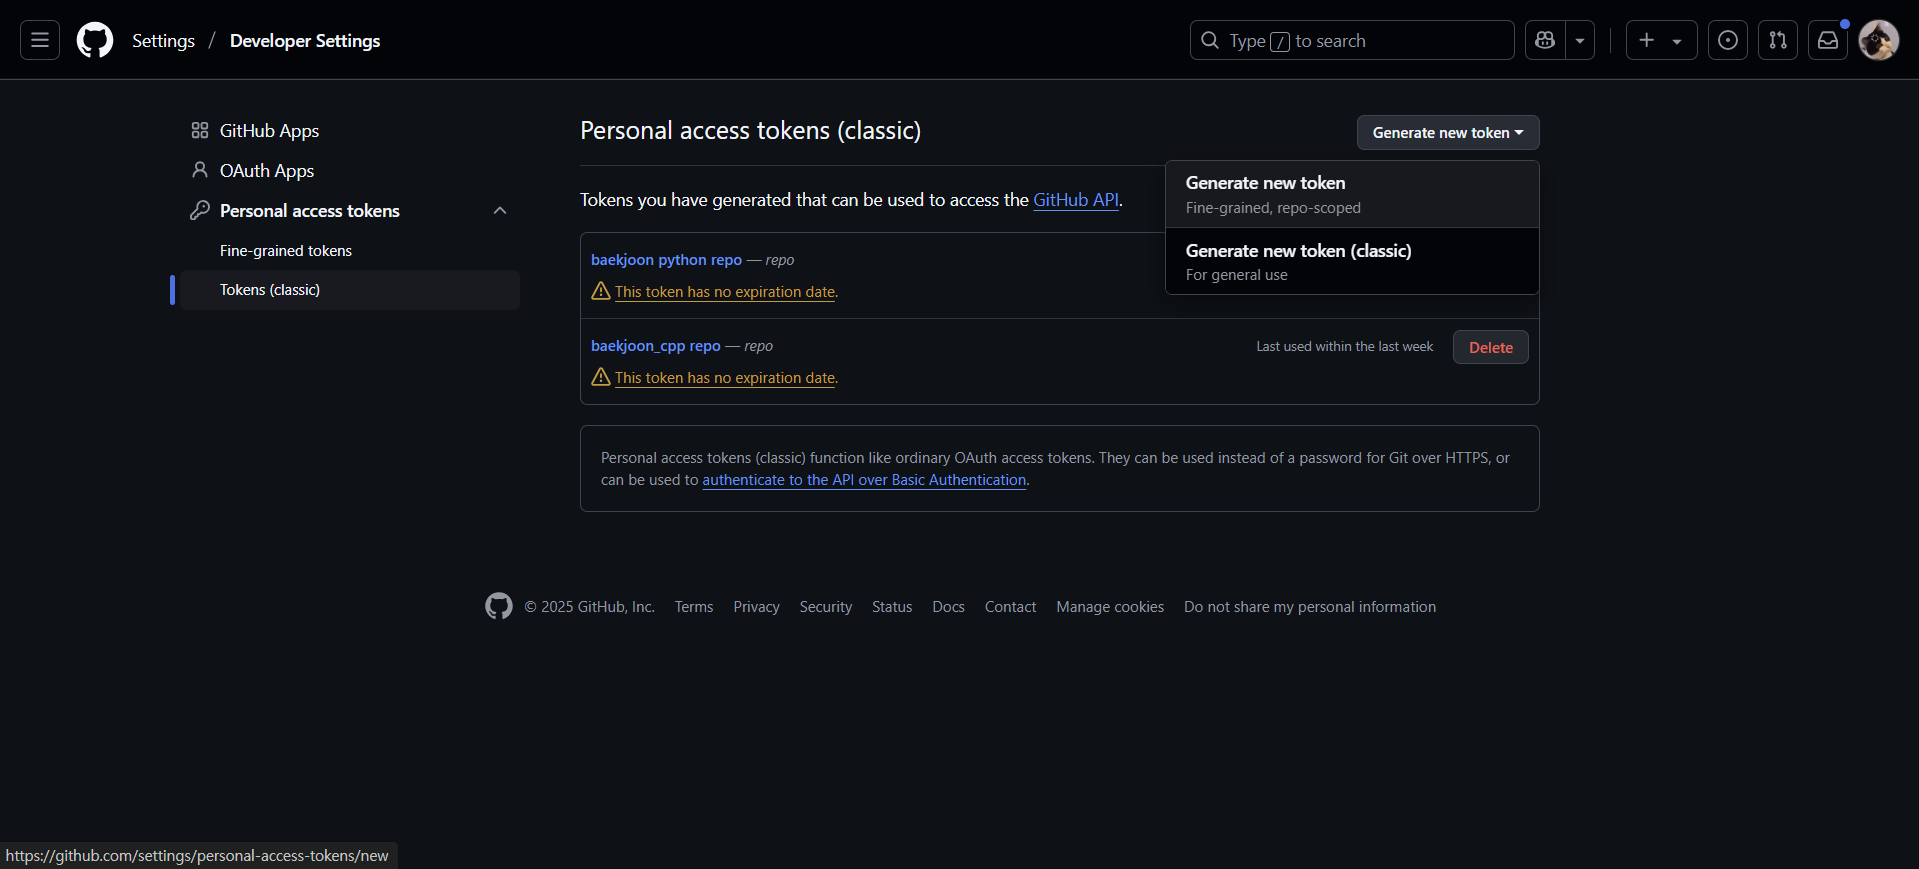
먼저 깃허브 토큰을 생성한다. 토큰 생성 페이지에 접속하여 Generate new tokens - Generate new token (classic) 을 클릭한다.
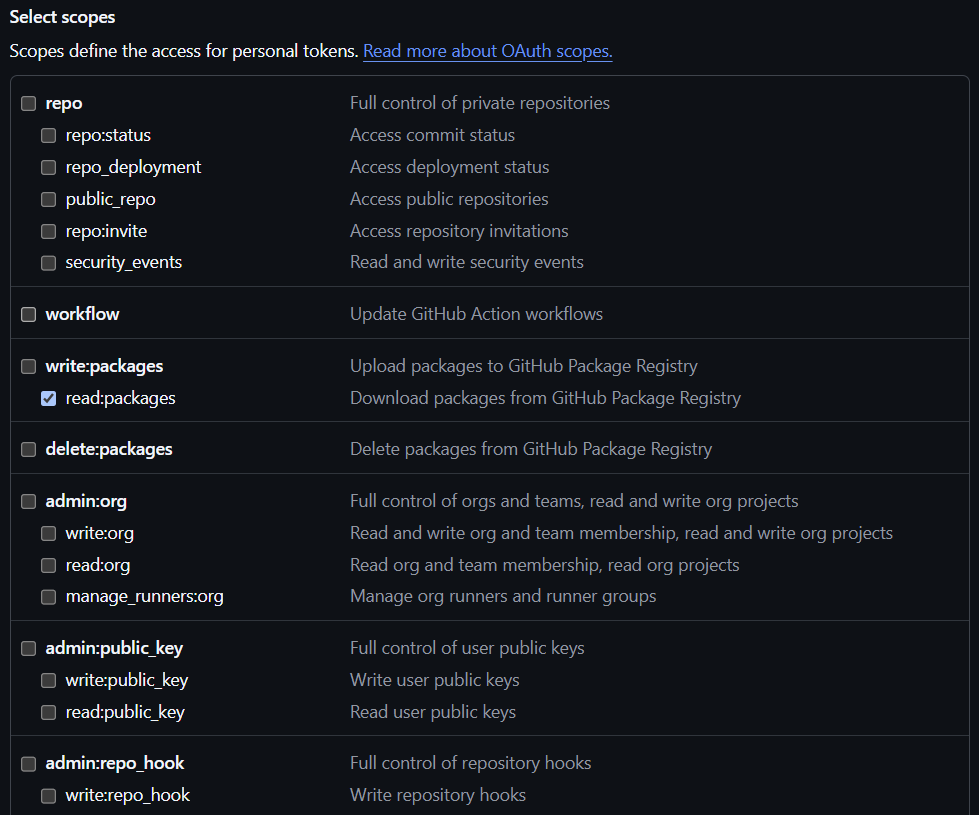
‘read:packages’ 옵션만 선택하고 토큰을 생성한다. 생성 후 토큰 키는 반드시 복사해서 보관해야 한다.
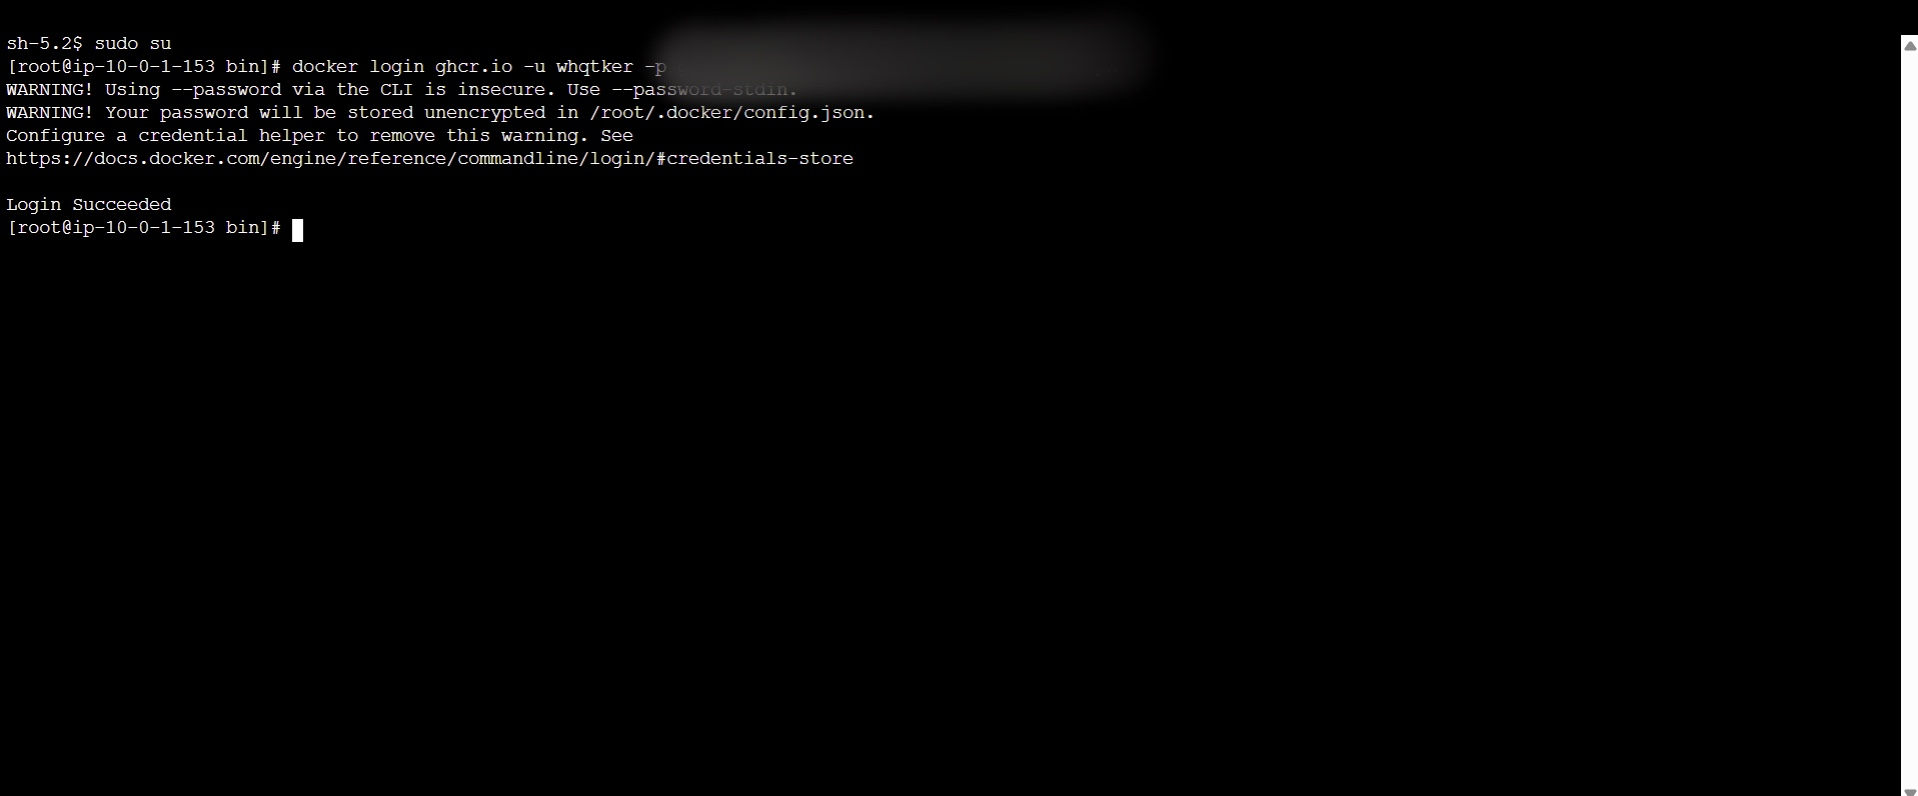
EC2의 Session Manager에 접속하여 sudo su , docker login ghcr.io -u [USERNAME] -p [YOUR_TOKEN] 명령을 입력한다.
‘Login Succeeded’가 나오게 되면 성공한 것이다.
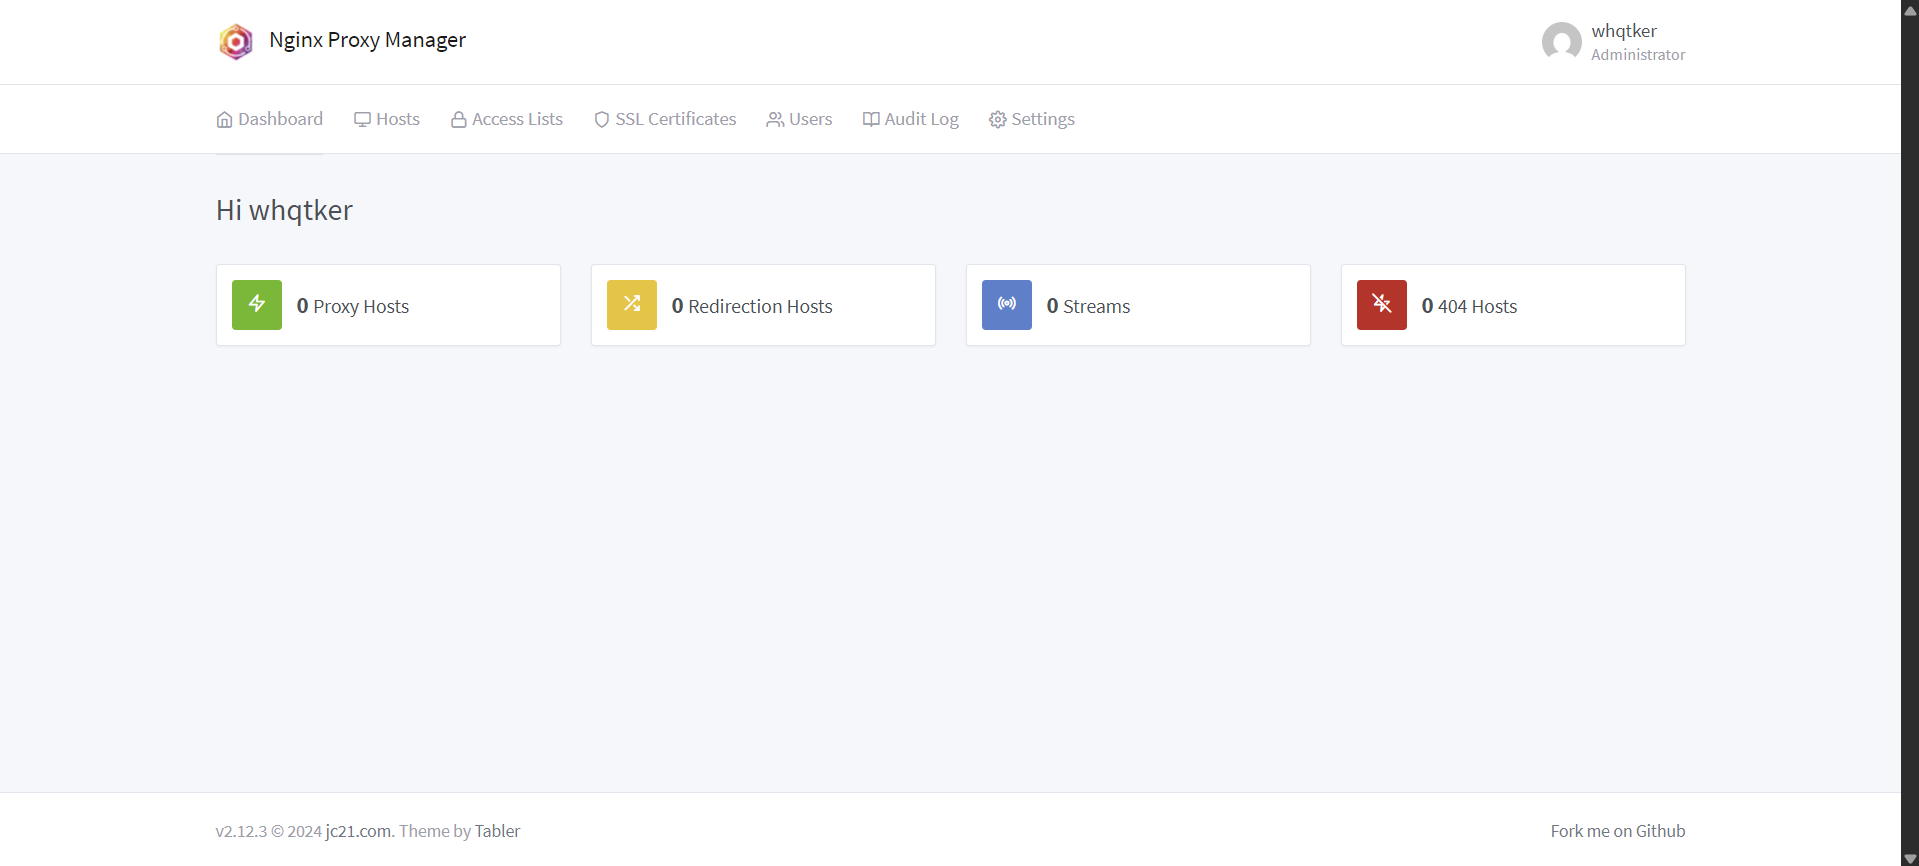
리버스 프록시 설정
nginx proxy manager 로 백엔드 도메인 주소 요청을 도커 컨테이너로 연결하자.
1
2
3
4
5
6
7
8
9
10
docker run -d \
  --name npm_container \
  --restart unless-stopped \
  -p 80:80 \
  -p 443:443 \
  -p 81:81 \
  -e TZ=Asia/Seoul \
  -v /practice/npm/volumes/data:/data \
  -v /practice/npm/volumes/etc/letsencrypt:/etc/letsencrypt \
  jc21/nginx-proxy-manager:latest
먼저 nginx proxy manager를 설치한다.
[EC2 IP 주소]:81 에 접속하여 로그인한다. 초기 계정 정보는 admin@example.com , changeme 이다.
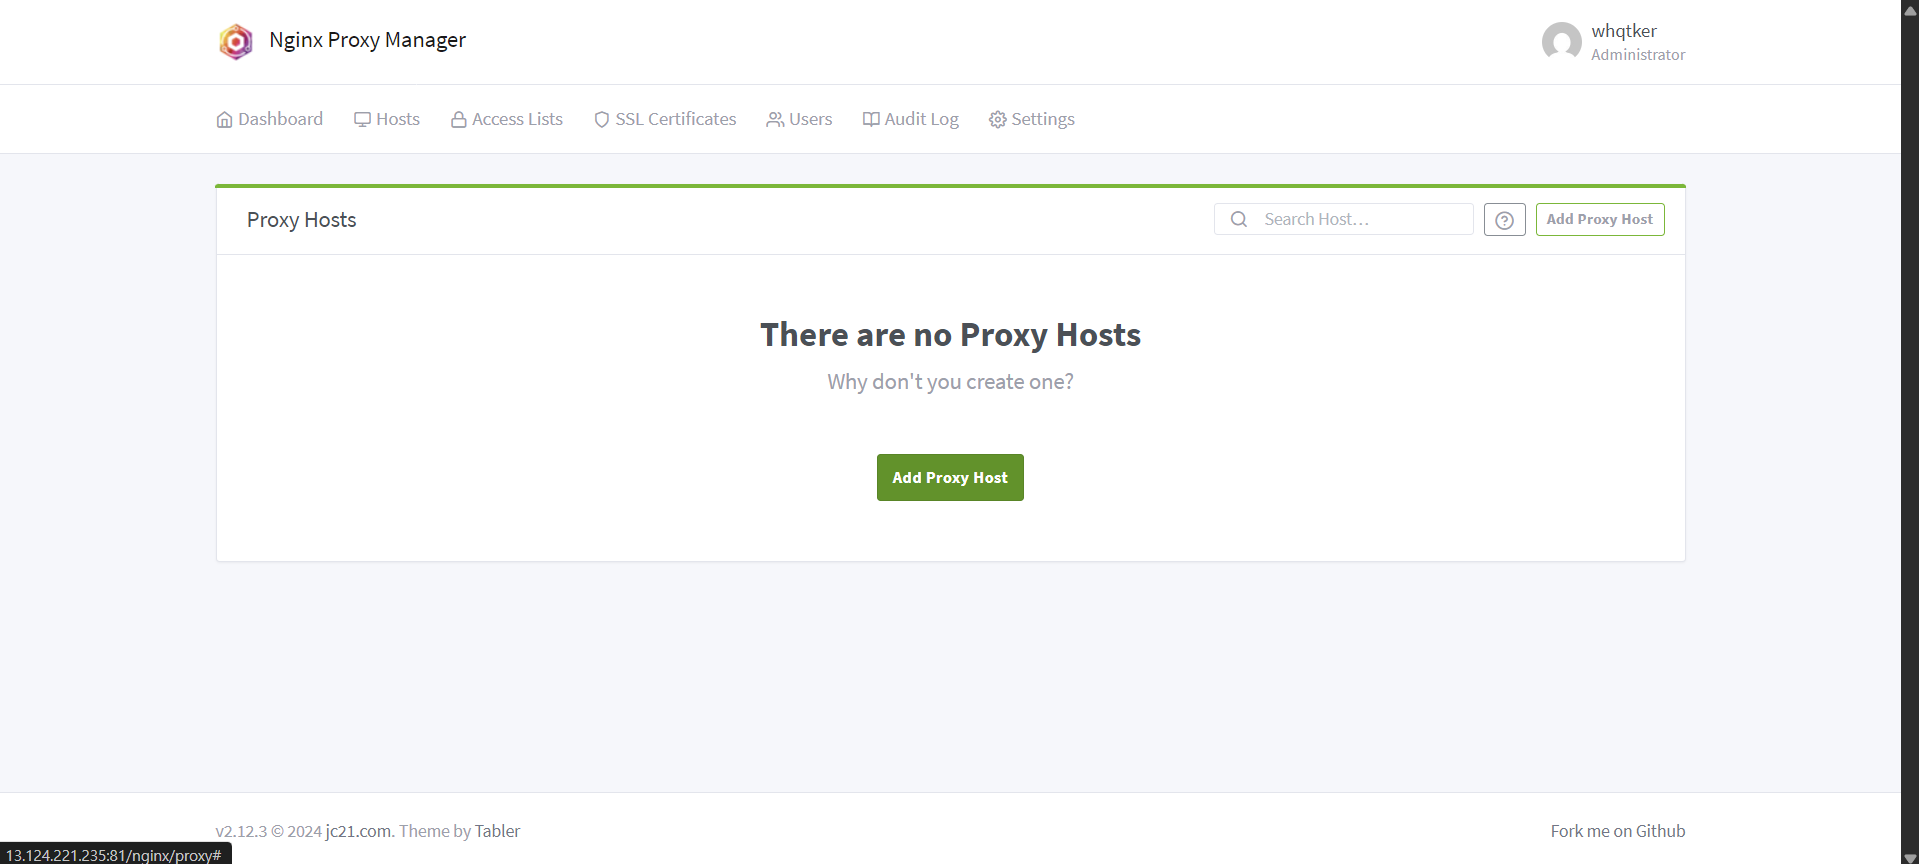
Host - Proxy Hosts - Add Proxy Host 를 클릭한다.
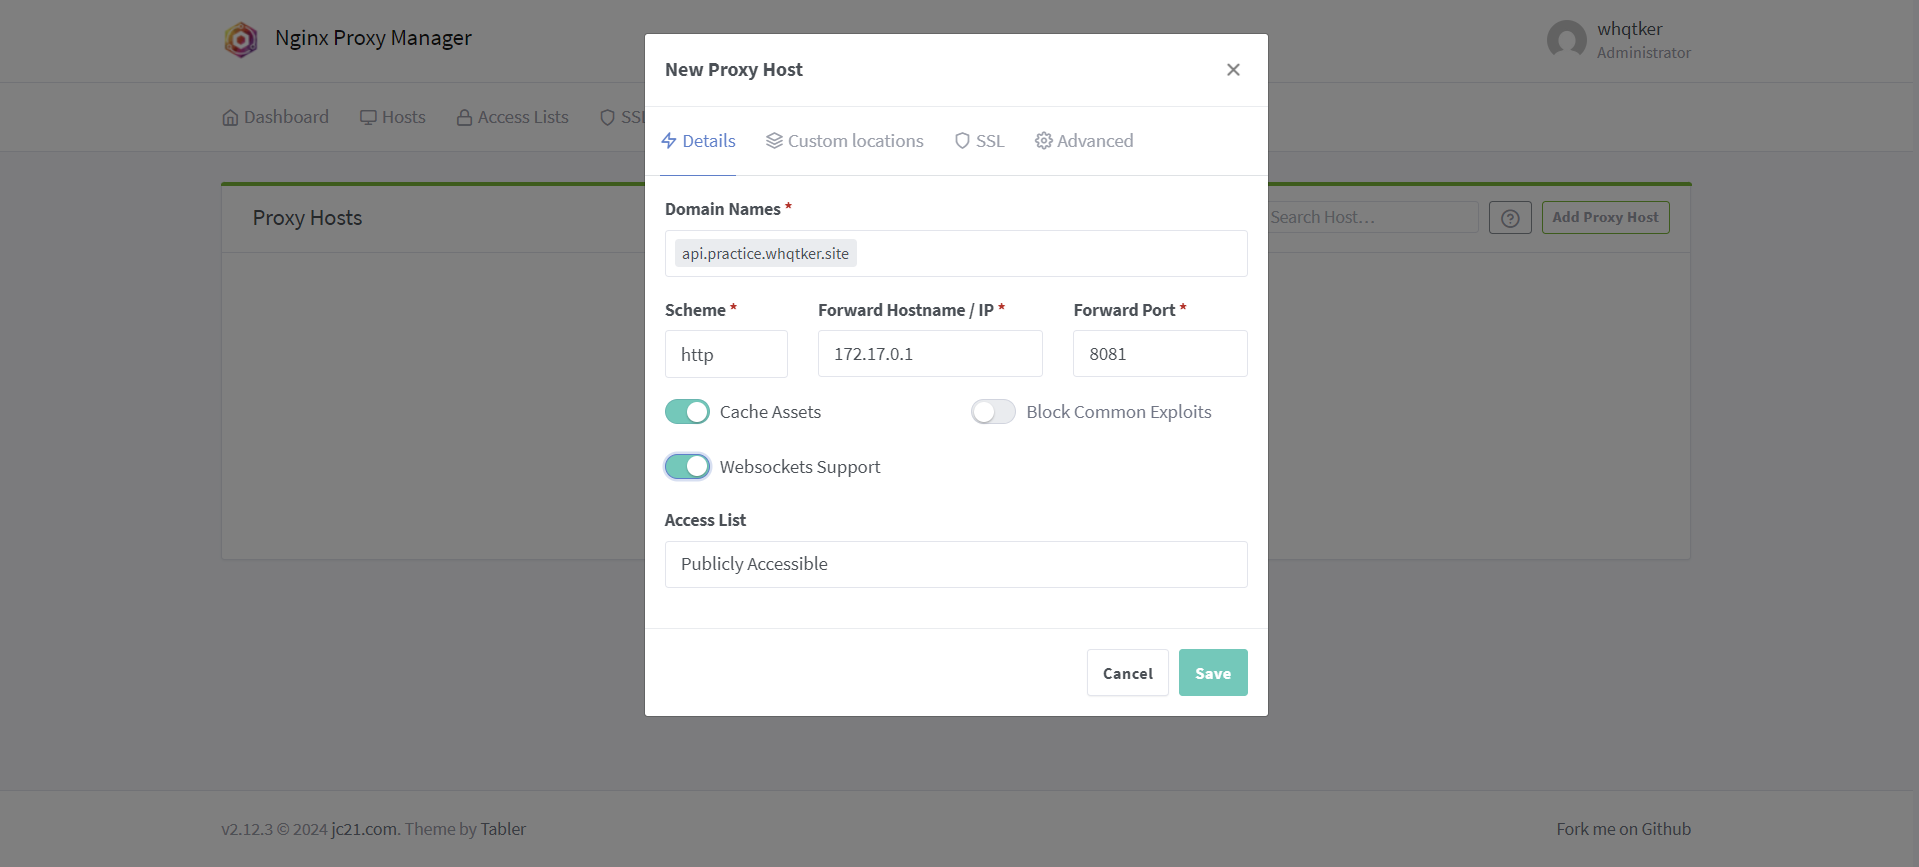
Details 탭에서 본인의 백엔드 도메인 이름을 입력하고 IP 주소는 172.17.0.1, 포트번호는 8081로 설정한다. Cache Assets, Websockets Supports 옵션은 활성화한다.
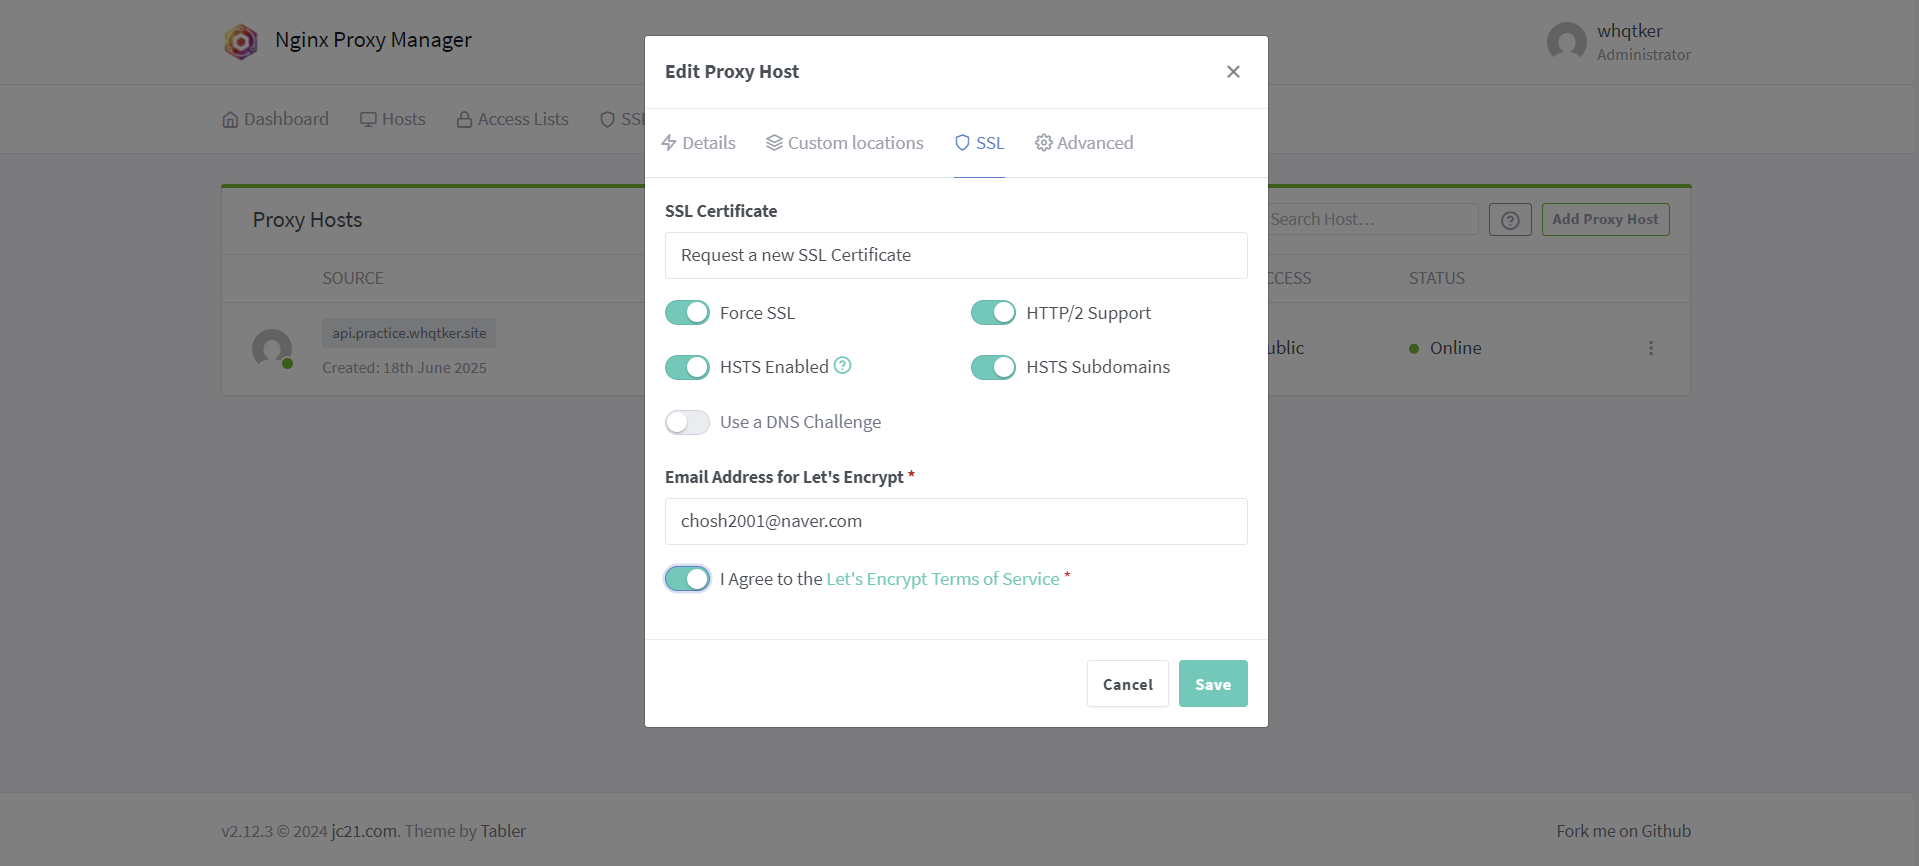
SSL 탭의 설정이다.
설정되기까지 시간이 다소 걸릴 수 있다. nslookup [백엔드 도메인 주소] 를 통해 EC2 IP 주소가 나온다면 성공적으로 연결된 것이다.
또한 해당 백엔드 도메인 주소로 접속했을 때 502 에러가 나온다면 잘 연결된 것이다.
무중단 배포 스크립트
1
2
yum install socat -y
yum install python -y
스크립트를 작성하기 전 EC2 인스턴스에 socat, python 을 설치한다.
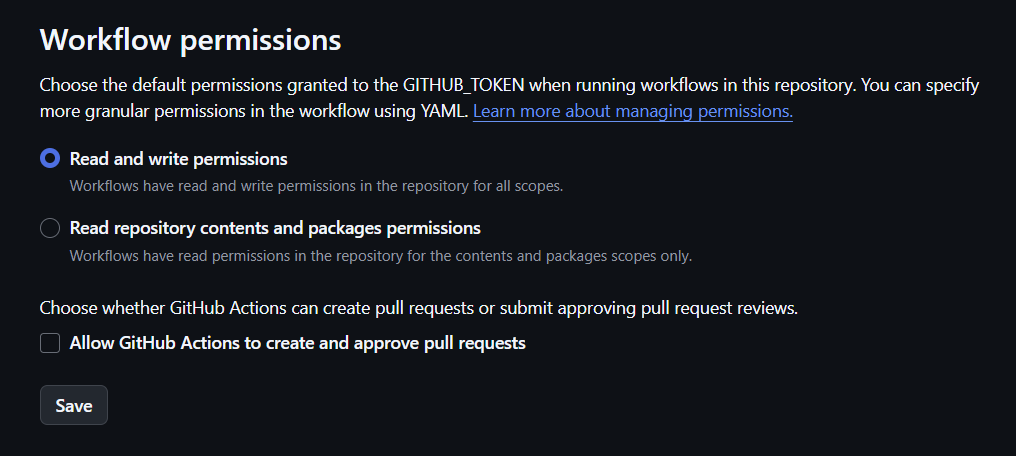
백엔드 레포지토리에서 Settings - Actions - General - Workflow permissions에서 ‘Read and write permissions’ 를 선택한다.
1
2
3
4
5
6
7
8
9
10
11
12
13
14
15
16
17
18
19
20
21
22
23
24
25
26
27
28
29
30
31
32
33
34
35
36
37
38
39
40
41
42
43
44
45
46
47
48
49
50
51
52
53
54
55
56
57
58
59
60
61
62
63
64
65
66
67
68
69
70
71
72
73
74
75
76
77
78
79
80
81
82
83
84
85
86
87
88
89
90
91
92
93
94
95
import os
import requests
import subprocess
import time
from typing import Dict, Optional

class ServiceManager:
    def __init__(self,
                 app_name: str = "prac-back-deploy",
                 repo_owner: str = "whqtker",
                 volume_path: str = "/practice/deployment/volumes/gen",
                 socat_port: int = 8081,
                 sleep_duration: int = 3) -> None:
        self.app_name: str = app_name
        self.repo_owner: str = repo_owner
        self.volume_path: str = volume_path
        self.socat_port: int = socat_port
        self.sleep_duration: int = sleep_duration
        self.services: Dict[str, int] = {
            'blue': 8082,
            'green': 8083
        }
        self.current_name: Optional[str] = None
        self.current_port: Optional[int] = None
        self.next_name: Optional[str] = None
        self.next_port: Optional[int] = None

    def _find_current_service(self) -> None:
        cmd: str = f"ps aux | grep 'socat -t0 TCP-LISTEN:{self.socat_port}' | grep -v grep | awk ''"
        current_service: str = subprocess.getoutput(cmd)
        if not current_service:
            self.current_name, self.current_port = 'green', self.services['green']
        else:
            self.current_port = int(current_service.split(':')[-1])
            self.current_name = next((name for name, port in self.services.items() if port == self.current_port), None)

    def _find_next_service(self) -> None:
        self.next_name, self.next_port = next(
            ((name, port) for name, port in self.services.items() if name != self.current_name),
            (None, None)
        )

    def _remove_container(self, name: str) -> None:
        os.system(f"docker stop {name} 2> /dev/null")
        os.system(f"docker rm -f {name} 2> /dev/null")

    def _run_container(self, name: str, port: int) -> None:
        os.system(
            f"docker run -d --name={name} --restart unless-stopped -p {port}:8080 -e TZ=Asia/Seoul -v {self.volume_path}:/gen --pull always ghcr.io/{self.repo_owner}/{self.app_name}")

    def _switch_port(self) -> None:
        cmd: str = f"ps aux | grep 'socat -t0 TCP-LISTEN:{self.socat_port}' | grep -v grep | awk ''"
        pid: str = subprocess.getoutput(cmd)

        if pid:
            os.system(f"kill -9 {pid} 2>/dev/null")

        time.sleep(5)

        os.system(
            f"nohup socat -t0 TCP-LISTEN:{self.socat_port},fork,reuseaddr TCP:localhost:{self.next_port} &>/dev/null &")

    def _is_service_up(self, port: int) -> bool:
        url = f"http://127.0.0.1:{port}/actuator/health"
        try:
            response = requests.get(url, timeout=5)
            if response.status_code == 200 and response.json().get('status') == 'UP':
                return True
        except requests.RequestException:
            pass
        return False

    def update_service(self) -> None:
        self._find_current_service()
        self._find_next_service()

        self._remove_container(self.next_name)
        self._run_container(self.next_name, self.next_port)

        while not self._is_service_up(self.next_port):
            print(f"Waiting for {self.next_name} to be 'UP'...")
            time.sleep(self.sleep_duration)

        self._switch_port()

        if self.current_name is not None:
            self._remove_container(self.current_name)

        print("Switched service successfully!")

if __name__ == "__main__":
    # 기본값 사용 또는 필요에 따라 인자 전달
    manager = ServiceManager()
    manager.update_service()
Blue-Green 무중단 배포 스크립트이다.
세 가지 포트 번호가 존재한다. 8081 포트는 socat 포트로, Blue 또는 Green 컨테이너로 라우팅하는 로드밸런서 역할을 한다. 8082, 8082 포트는 각각 Blue, Green 컨테이너 포트이다.
1
2
  def _find_current_service(self) -> None:
변경됨. 다시 작성
현재 실행 중인 컨테이너를 식별하는 함수이다. 활성화된 socat 프로세스가 없는 경우 Green 컨테이너를 기본값으로 설정한다.
1
2
  def _find_next_service(self) -> None:
재작성
다음 배포 대상 컨테이너를 찾는 함수이다.
1
2
3
  def _run_container(self, name: str, port: int) -> None:
      os.system(
          f"docker run -d --name={name} --restart unless-stopped -p {port}:8080 -e TZ=Asia/Seoul -v /practice/deployment/volumes/gen:/gen --pull always ghcr.io/whqtker/deployment")
본인의 스프링부트 애플리케이션 포트 번호에 맞게 수정해야 한다. 현재 기본 포트인 8080이 설정되어 있다.
1
2
3
4
5
6
7
8
9
10
11
  def _switch_port(self) -> None:
      cmd: str = f"ps aux | grep 'socat -t0 TCP-LISTEN:{self.socat_port}' | grep -v grep | awk ''"
      pid: str = subprocess.getoutput(cmd)

      if pid:
          os.system(f"kill -9 {pid} 2>/dev/null")

      time.sleep(5)

      os.system(
          f"nohup socat -t0 TCP-LISTEN:{self.socat_port},fork,reuseaddr TCP:localhost:{self.next_port} &>/dev/null &")
트래픽 전환을 담당하는 함수이다. 현재 실행 중인 socat 프로세스를 종료하고 nohup 을 통해 백그라운드에서 새로운 포트로 트래픽을 라우팅하는 socat 프로세스를 시작한다.
1
2
3
4
5
6
7
8
9
def _is_service_up(self, port: int) -> bool:
    url = f"http://127.0.0.1:{port}/actuator/health"
    try:
        response = requests.get(url, timeout=5)
        if response.status_code == 200 and response.json().get('status') == 'UP':
            return True
    except requests.RequestException:
        pass
    return False
1
2
3
dependencies {
    implementation 'org.springframework.boot:spring-boot-starter-actuator'
}
Spring Boot Actuator 의존성을 추가해야 actuator 엔드포인트가 존재한다.
1
2
3
4
5
6
7
8
9
10
11
12
app:
  name: prac-back-deploy

repository:
  name: practice-backend-deployment

deployment:
  base_dir: /practice/deployment
  volumes:
    - /practice/deployment/volumes/gen
    - /practice/deployment/logs
  script_path: infraScript/zero_downtime_deploy.py
1
2
3
4
5
6
7
8
9
10
11
12
13
14
15
16
17
18
19
20
21
22
23
24
25
26
27
28
29
30
31
32
33
34
35
36
37
38
39
40
41
42
43
44
45
46
47
48
49
50
51
52
53
54
55
56
57
58
59
60
61
62
63
64
65
66
67
68
69
70
71
72
73
74
75
76
77
78
79
80
81
82
83
84
85
86
87
88
89
90
91
92
93
94
95
96
97
98
99
100
101
102
103
104
105
106
107
108
109
110
111
112
113
114
115
116
name: 'deploy'
on:
  push:
    paths:
      - '.github/workflows/**'
      - '.github/configs/**'
      - 'src/**'
      - 'build.gradle'
      - 'Dockerfile'
      - 'README.md'
      - 'infraScript/**'
    branches:
      - 'main'

jobs:
  loadConfig:
    runs-on: ubuntu-latest
    outputs:
      app_name: $
      deployment_base_dir: $
      script_path: $
      repo_name: $
    steps:
      - uses: actions/checkout@v4
      - name: 설정 파일 로드
        id: set_config
        run: |
          app_name=$(yq '.app.name' .github/configs/deploy-config.yml)
          deployment_base_dir=$(yq '.deployment.base_dir' .github/configs/deploy-config.yml)
          script_path=$(yq '.deployment.script_path' .github/configs/deploy-config.yml)
          repo_name=$(yq '.repository.name' .github/configs/deploy-config.yml)

          echo "app_name=$app_name" >> $GITHUB_OUTPUT
          echo "deployment_base_dir=$deployment_base_dir" >> $GITHUB_OUTPUT
          echo "script_path=$script_path" >> $GITHUB_OUTPUT
          echo "repo_name=$repo_name" >> $GITHUB_OUTPUT

  makeTagAndRelease:
    runs-on: ubuntu-latest
    needs: loadConfig
    outputs:
      tag_name: $
    steps:
      - uses: actions/checkout@v4
      - name: Create Tag
        id: create_tag
        uses: mathieudutour/github-tag-action@v6.1
        with:
          github_token: $
      - name: Create Release
        id: create_release
        uses: actions/create-release@v1
        env:
          GITHUB_TOKEN: $
        with:
          tag_name: $
          release_name: Release $
          body: $
          draft: false
          prerelease: false

  buildImageAndPush:
    name: 도커 이미지 빌드와 푸시
    needs: [makeTagAndRelease, loadConfig]
    runs-on: ubuntu-latest
    steps:
      - uses: actions/checkout@v4
      - name: Docker Buildx 설치
        uses: docker/setup-buildx-action@v2
      - name: 레지스트리 로그인
        uses: docker/login-action@v2
        with:
          registry: ghcr.io
          username: $
          password: $
      - name: set lower case owner name
        run: |
          echo "OWNER_LC=${OWNER,,}" >> ${GITHUB_ENV}
        env:
          OWNER: "$"
      - name: application-secret.yml 생성
        env:
          ACTIONS_STEP_DEBUG: true
          APPLICATION_SECRET: $
        run: echo "$APPLICATION_SECRET" > src/main/resources/application-secret.yml
      - name: 빌드 앤 푸시
        uses: docker/build-push-action@v3
        with:
          context: .
          push: true
          tags: |
            ghcr.io/$/$:$,
            ghcr.io/$/$:latest

  deploy:
    runs-on: ubuntu-latest
    needs: [buildImageAndPush, loadConfig]
    steps:
      - name: AWS SSM Send-Command
        uses: peterkimzz/aws-ssm-send-command@master
        id: ssm
        with:
          aws-region: $
          aws-access-key-id: $
          aws-secret-access-key: $
          instance-ids: $
          working-directory: /
          comment: Deploy
          command: |
            mkdir -p $
            mkdir -p $/volumes/gen
            mkdir -p $/logs

            curl -o $/zero_downtime_deploy.py https://raw.githubusercontent.com/$/$/main/$
            chmod +x $/zero_downtime_deploy.py
            sudo python3 $/zero_downtime_deploy.py
main 브랜치에 지정된 경로의 파일 변경사항이 push되면 위 워크플로우가 동작한다. docker 이미지를 빌드 후 ghcr.io 에 push하고, AWS의 SSM을 통해 EC2 인스턴스에서 무중단 배포 스크립트를 수행한다.
1
2
3
4
5
6
7
8
9
10
11
12
13
14
15
16
17
18
19
20
21
22
23
24
25
FROM gradle:jdk21-graal-jammy as builder

WORKDIR /app

COPY gradlew .
COPY gradle gradle
COPY build.gradle .
COPY settings.gradle .

RUN chmod +x ./gradlew

RUN ./gradlew dependencies --no-daemon

COPY src src

RUN ./gradlew build --no-daemon -x test

FROM ghcr.io/graalvm/jdk-community:21

WORKDIR /app

COPY --from=builder /app/build/libs/*.jar app.jar

ENTRYPOINT ["java", "-jar", "-Dspring.profiles.active=prod", "app.jar"]
스프링 부트 애플리케이션을 빌드하여 컨테이너화하는 코드이다. 본인의 JDK 버전에 맞게 수정하면 된다.
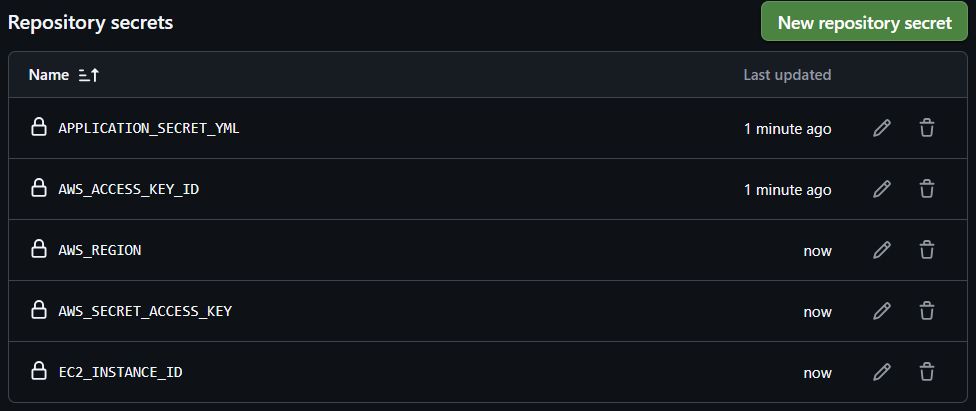
스크립트 작성 후 백엔드 레포지토리에 깃허브 액션에 사용되는 환경 변수를 작성해야 한다.

git push 를 하게 되면 인스턴스에 스프링부트 컨테이너가 정상적으로 올라간다.
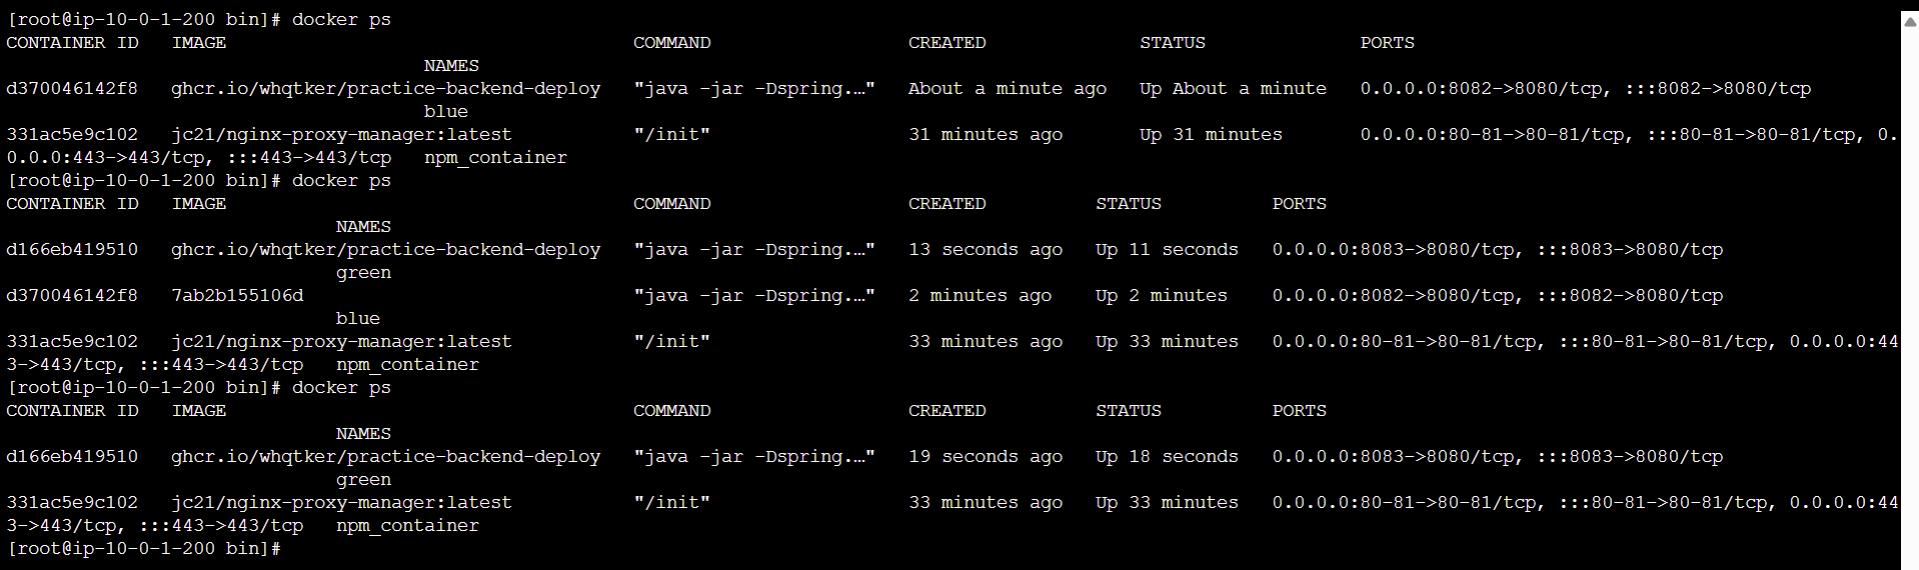
변경사항 반영 후 다시 git push 를 하면 Blue, Green 컨테이너가 올바르게 종료 및 실행되는 것을 확인할 수 있다.
📌 깃허브 링크
https://github.com/whqtker/practice-frontend-deployment https://github.com/whqtker/practice-backend-deployment