채팅 구현 예제 w/ Polling, Long Polling, SSE, WebSocket
📌 개요
Polling, Long Polling, SSE, WebSocket를 사용하여 채팅 기능을 구현하자. 명시된 기술들의 구현 방식에 초점을 맞추어 작성되었다.
Polling은 클라이언트가 주기적으로 서버에 요청을 보내고, 서버는 클라이언트의 요청에 대한 응답을 리턴하는 방법이다.
Long polling은 클라이언트가 서버에 요청을 보낸 후 서버가 새로운 데이터가 준비될 때까지 요청을 유지하는 방식이다.
SSE(Server-Sent Events)는 클라이언트가 서버에 요청을 보내면 서버가 지속적인 연결을 유지하여 실시간으로 클라이언트에게 데이터를 전송하는 방법이다.
WebSocket은 클라이언트와 서버 간 지속적인 연결을 통한 양방향 데이터 전송을 가능하게 하는 방법이다.
📌 개발 환경
JDK: 21
Java: 21
Spring Boot: 3.4.4
📌 수동
Server
1
2
3
4
5
6
7
8
9
10
11
12
13
14
15
16
17
18
19
20
21
22
23
24
25
26
27
28
29
30
31
32
33
@Controller
@RequiredArgsConstructor
@RequestMapping("/chat")
public class ChatController {
    private final ChatService chatService;

    @PostMapping("/write")
    @ResponseBody
    public ResponseEntity<ChatDto.WriteMessageResponse> writeMessage(@RequestBody ChatDto.WriteMessageRequest writeMessageRequest) {
        Chat chat = chatService.writeMessage(writeMessageRequest.getName(), writeMessageRequest.getContent());

        return ResponseEntity.ok(
                ChatDto.WriteMessageResponse.builder()
                        .chat(chat)
                        .build()
        );
    }

    // ...

    @GetMapping("/messages")
    @ResponseBody
    public ResponseEntity<ChatDto.MessagesResponse> messages(Long fromId) {
        return ResponseEntity.ok(
                ChatDto.MessagesResponse.builder()
                        .chats(chatService.getMessages(fromId))
                        .totalCount(chatService.getTotalCount())
                        .build()
        );
    }

    // ...
}
/chat/write 에 접근하면 사용자의 이름과 메세지를 DB에 저장한다.
/chat/messages?fromId={id} 에 접근하면 id 이후의 메세지들을 가져온다.
Client
1
2
3
4
5
6
7
8
9
10
11
12
13
14
15
16
17
18
19
20
21
22
23
24
25
26
27
28
29
30
31
32
33
34
35
36
37
38
39
40
41
42
43
44
45
46
47
48
49
50
51
52
53
54
55
56
57
58
59
60
61
62
63
64
65
66
67
68
69
70
71
72
73
74
75
76
77
78
79
80
81
82
83
84
85
86
87
88
89
<div class="chat">
    <form
            class="chat__write-message"
            onsubmit="Chat__writeMessage(this); return false;"
    >
        <input type="text" placeholder="작성자" name="name" />
        <input type="text" placeholder="내용을 입력해주세요." name="content" />
        <input type="submit" value="작성" />
    </form>
    <div class="chat__message-box">
        <ul class="chat__message-ul"></ul>
    </div>
</div>
<button onclick="Chat__loadMore();">새로고침</button>
<script>
    function fetchPost(url, data) {
        return fetch(url, {
            method: "POST",
            headers: {
                "Content-Type": "application/json",
                Accept: "application/json",
            },
            body: JSON.stringify(data),
        }).then((response) => response.json());
    }

    function fetchGet(url, data) {
        let query = Object.keys(data)
            .map((k) => encodeURIComponent(k) + "=" + encodeURIComponent(data[k]))
            .join("&");
        return fetch(url + "?" + query, {
            method: "GET",
            headers: {
                "Content-Type": "application/json",
                Accept: "application/json",
            },
        }).then((response) => response.json());
    }

    // 메시지 작성 처리 함수
    function Chat__writeMessage(form) {
        form.name.value = form.name.value.trim();
        if (form.name.value.length == 0) {
            alert("작성자를 입력해주세요.");
            form.name.focus();
            return;
        }

        // 메시지 내용 유효성 검사
        form.content.value = form.content.value.trim();
        if (form.content.value.length == 0) {
            form.content.focus();
            return;
        }

        // 서버에 메시지 전송
        fetchPost("/chat/write", {
            name: form.name.value,
            content: form.content.value,
        }).then(console.log);

        form.content.value = "";
        form.content.focus();
    }

    // 채팅 메세지들 읽기
    let Chat__lastLoadedId = 0;
    function Chat__loadMore() {
        fetchGet("/chat/messages", {
            fromId: Chat__lastLoadedId
        })
            .then(body => {
                Chat__drawMessages(body.chats);
            });
    }
    const Chat__elMessageUl = document.querySelector('.chat__message-ul');
    function Chat__drawMessages(messages) {
        console.log("messages", messages);
        if (messages.length > 0)
            Chat__lastLoadedId = messages[messages.length - 1].id;
        messages.forEach((message) => {
            Chat__elMessageUl
                .insertAdjacentHTML(
                    "afterBegin",
                    `<li>${message.name} : ${message.content}</li>`
                );
        });
    }
</script>
메세지를 입력하면 fetchPost() 를 통해 서버로 전송된다.
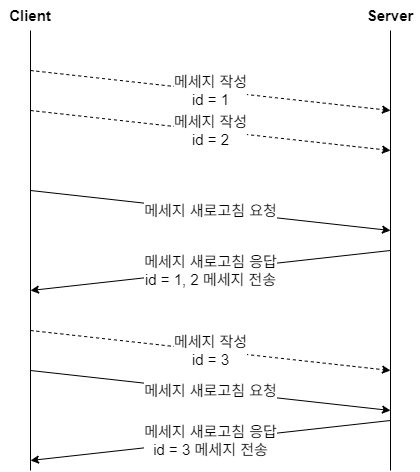
사용자가 ‘새로고침’ 버튼을 클릭하면 Chat__loadMore() 이 호출된다. 서버에게 Chat__lastLoadedId 이후의 메세지들을 요청한다.
동작 과정
📌 Polling
Server
Polling은 클라이언트가 서버로 주기적으로 요청을 보내는 방법이다. 서버는 요청에 대한 응답을 보내주기만 하면 되므로, 따로 특별한 처리를 하지 않아도 된다. 이전 서버 코드와 동일하다.
Client
1
2
3
4
5
6
7
8
9
10
11
12
13
14
15
16
17
18
19
20
21
22
23
24
25
26
27
28
29
<!-- 새로고침 버튼을 제거한다. -->
<script>
    // ...

    let Chat__lastLoadedId = 0;
    function Chat__loadMore() {
        fetchGet("/chat/messages", {
            fromId: Chat__lastLoadedId
        })
            .then(body => {
                Chat__drawMessages(body.chats);
            });
    }
    const Chat__elMessageUl = document.querySelector('.chat__message-ul');
    function Chat__drawMessages(messages) {
        console.log("messages", messages);
        if (messages.length > 0)
            Chat__lastLoadedId = messages[messages.length - 1].id;
        messages.forEach((message) => {
            Chat__elMessageUl
                .insertAdjacentHTML(
                    "afterBegin",
                    `<li>${message.name} : ${message.content}</li>`
                );
        });
        setTimeout(Chat__loadMore, 500); // 0.5초마다 요청
    }
    Chat__loadMore(); // 초기 메세지 로드
</script>
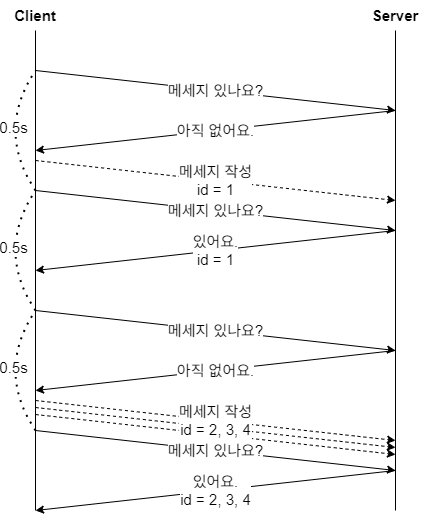
일정 주기(0.5초)마다 Chat__loadMore() 을 호출한다.
동작 과정
📌 Long Polling
Server
1
2
3
4
5
6
7
8
9
10
11
12
13
14
15
16
17
18
19
20
21
22
23
24
25
26
27
28
29
30
31
32
33
34
35
36
37
38
39
40
41
42
43
@Controller
@RequiredArgsConstructor
@RequestMapping("/chat")
public class ChatController {
    private final ChatService chatService;

    @PostMapping("/write")
    @ResponseBody
    public ResponseEntity<ChatDto.WriteMessageResponse> writeMessage(@RequestBody ChatDto.WriteMessageRequest writeMessageRequest) {
        Chat chat = chatService.writeMessage(writeMessageRequest.getName(), writeMessageRequest.getContent());

        return ResponseEntity.ok(
                ChatDto.WriteMessageResponse.builder()
                        .chat(chat)
                        .build()
        );
    }

    // ...

    @GetMapping("/messages/long-polling")
    @ResponseBody
    public ResponseEntity<ChatDto.MessagesResponse> longPollingMessages(Long fromId) throws InterruptedException {
        List<Chat> chats;

        while (true) {
            chats = chatService.getMessages(fromId);

            if (!chats.isEmpty()) {
                return ResponseEntity.ok(
                        ChatDto.MessagesResponse.builder()
                                .chats(chats)
                                .totalCount(chatService.getTotalCount())
                                .build()
                );
            }

            Thread.sleep(500);
        }
    }

    // ...
}
클라이언트가 메세지 조회 요청을 보내면 서버에서 주기적으로 새로운 메세지가 추가되었는지 확인해야 한다. 0.5초마다 새로운 메세지가 추가되었는지 확인한다.
Client
1
2
3
4
5
6
7
8
9
10
11
12
13
14
15
16
17
18
19
20
21
22
23
24
25
26
27
28
29
30
31
32
33
34
35
36
37
38
39
40
41
42
43
44
45
46
47
48
49
50
51
52
<!-- ... -->

<script>
    // ...

    // Long Polling - GET
    function fetchGetLongPolling(url, data) {
        let query = Object.keys(data)
            .map((k) => encodeURIComponent(k) + "=" + encodeURIComponent(data[k]))
            .join("&");

        return fetch(url + "?" + query, {
            method: "GET",
            headers: {
                "Content-Type": "application/json",
                Accept: "application/json",
            },
            // Long Polling 타임아웃 설정
            signal: AbortSignal.timeout(30000) // 30초 타임아웃
        }).then((response) => response.json());
    }

    // ...

    // Long Polling을 사용한 메시지 로드 함수
    function Chat__loadMore() {
        fetchGetLongPolling("/chat/messages/long-polling", {
            fromId: Chat__lastLoadedId
        })
        .then(body => {
            if (body.chats && body.chats.length > 0) {
                Chat__drawMessages(body.chats);
            }
        })
        .catch(error => {
            if (error.name === 'TimeoutError') {
                console.log("Long polling timeout");
            } else {
                console.error("Error in long polling:", error);
            }
        })
        .finally(() => {
            // 응답을 받은 후 즉시 다음 요청 시작
            Chat__loadMore();
        });
    }

    // ...

    // 초기 메시지 로드 시작
    Chat__loadMore();
</script>
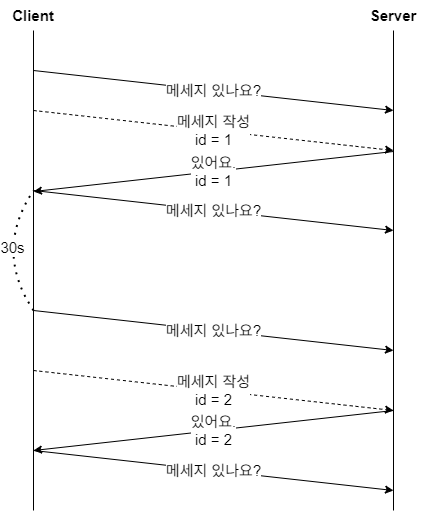
만약 클라이언트가 서버의 응답을 받으면 클라이언트는 즉시 새로운 요청을 서버에게 보낸다. 클라이언트 역시 30초 타임아웃을 설정하였고, 타임아웃이 발생하면 새로운 요청을 서버에 전송한다.
동작 과정
📌 SSE
Server
1
2
3
4
5
6
7
8
9
10
11
12
13
14
15
16
17
18
19
20
21
22
23
24
25
26
27
28
29
30
31
32
33
34
35
36
37
38
@Component
@Slf4j
public class SseEmitters {
    private final List<SseEmitter> emitters = new CopyOnWriteArrayList<>();

    public SseEmitter add(SseEmitter emitter) {
        this.emitters.add(emitter);

        emitter.onCompletion(() -> {
            this.emitters.remove(emitter);
        });

        emitter.onTimeout(() -> {
            emitter.complete();
        });

        return emitter;
    }

    public void noti(String eventName) {
        noti(eventName, Ut.mapOf());
    }

    public void noti(String eventName, Map<String, Object> data) {
        emitters.forEach(emitter -> {
            try {
                emitter.send(
                        SseEmitter.event()
                                .name(eventName)
                                .data(data)
                );
            } catch (ClientAbortException e) {
            } catch (IOException e) {
                throw new RuntimeException(e);
            }
        });
    }
}
add() 는 새로운 SSE 연결을 리스트에 추가하고, 연결 종료 또는 타임아웃이 발생한 경우에 대한 처리를 담고 있다.
noti() 는 서버에 연결된 모든 클라이언트에 이벤트를 전송하는 역할을 한다.
1
2
3
4
5
6
7
8
9
10
11
12
13
14
15
16
17
18
19
20
21
22
23
@Controller
@RequestMapping("/sse")
@RequiredArgsConstructor
public class SseController {
    private final SseEmitters sseEmitters;

    // /sse/connect로 GET 요청이 오면 SSE 스트림을 생성
    @GetMapping(value = "/connect", produces = MediaType.TEXT_EVENT_STREAM_VALUE)
    public ResponseEntity<SseEmitter> connect() {
        SseEmitter emitter = new SseEmitter();

        sseEmitters.add(emitter);

        try {
            emitter.send(SseEmitter.event()
                    .name("connect")
                    .data("connected!"));
        } catch (IOException e) {
            throw new RuntimeException(e);
        }
        return ResponseEntity.ok(emitter);
    }
}
/sse/connect 에 접근하는 경우 동작을 살펴보자. 먼저 새로운 SSE emitter를 생성하고, 리스트에 추가하여 관리한다. 초기 연결 수립 시 서버는 클라이언트에게 연결 성공 메세지를 전송한다.
1
2
3
4
5
6
7
8
9
10
11
12
13
14
15
16
17
18
19
20
21
22
23
24
25
26
27
28
29
30
31
32
33
34
35
@Controller
@RequiredArgsConstructor
@RequestMapping("/chat")
public class ChatController {
    private final ChatService chatService;

    // ...

    @PostMapping("/write-sse")
    @ResponseBody
    public ResponseEntity<ChatDto.WriteMessageResponse> writeMessageSse(@RequestBody ChatDto.WriteMessageRequest writeMessageRequest) {
        Chat chat = chatService.writeMessageSse(writeMessageRequest.getName(), writeMessageRequest.getContent());

        return ResponseEntity.ok(
                ChatDto.WriteMessageResponse.builder()
                        .chat(chat)
                        .build()
        );
    }

    // ...

    @GetMapping("/messages")
    @ResponseBody
    public ResponseEntity<ChatDto.MessagesResponse> messages(Long fromId) {
        return ResponseEntity.ok(
                ChatDto.MessagesResponse.builder()
                        .chats(chatService.getMessages(fromId))
                        .totalCount(chatService.getTotalCount())
                        .build()
        );
    }

    // ...
}
1
2
3
4
5
6
7
8
9
10
11
12
13
14
15
16
17
18
19
20
21
22
23
@Service
@RequiredArgsConstructor
public class ChatService {
    private final ChatRepository chatRepository;
    private final SseEmitters sseEmitters;

    // ...

    @Transactional
    public Chat writeMessageSse(String name, String content) {
        Chat chat = Chat.builder()
                .name(name)
                .content(content)
                .createDate(LocalDateTime.now())
                .build();

        sseEmitters.noti("chat__messageAdded");

        return chatRepository.save(chat);
    }

    // ...
}
/write-sse 에 접근하면 서비스 로직에서 noti() 를 통해 chat__messageAdded 이벤트를 연결된 모든 클라이언트에 브로드캐스트한다.
Client
1
2
3
4
5
6
7
8
9
10
11
12
13
14
15
16
17
18
19
20
21
22
23
24
25
26
27
<!-- ... -->
<script>
    // ...

    // 메시지 작성 처리 함수
    function Chat__writeMessage(form) {
        // ...

        fetchPost("/chat/write-sse", {
            name: form.name.value,
            content: form.content.value,
        }).then(console.log);

        form.content.value = "";
        form.content.focus();
    }

    // ...

    Chat__loadMore();

    const sse = new EventSource("/sse/connect");

    sse.addEventListener('chat__messageAdded', e => {
        Chat__loadMore();
    });
</script>
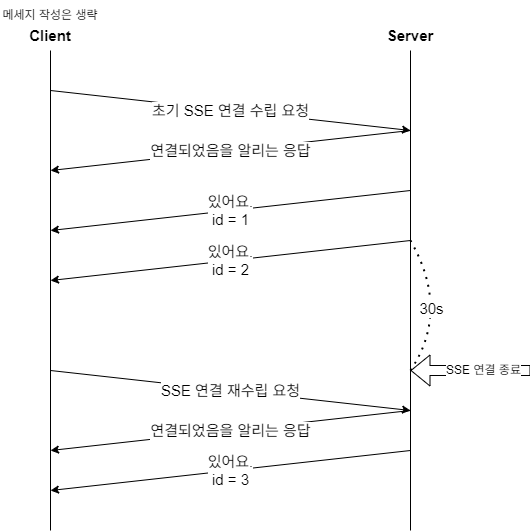
setTimeout() 을 제거하고, EventSource 객체를 생성하여 서버와 연결을 시작한다.
동작 과정
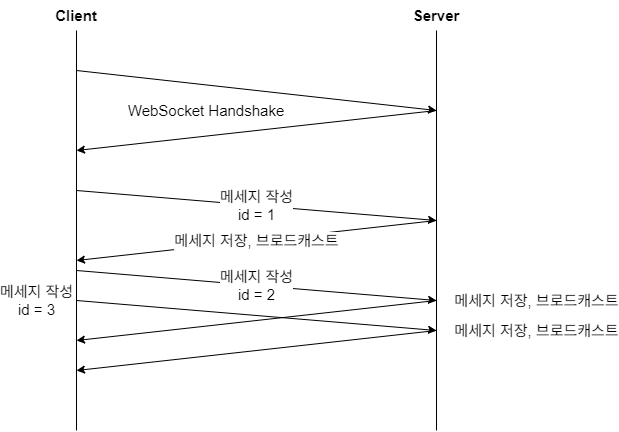
📌 WebSocket
Server
1
2
3
4
5
6
7
8
9
10
11
12
13
@Configuration
@EnableWebSocketMessageBroker
public class WebSocketConfig implements WebSocketMessageBrokerConfigurer {
    @Override
    public void registerStompEndpoints(StompEndpointRegistry registry) {
        registry.addEndpoint("/ws").withSockJS();
    }
    @Override
    public void configureMessageBroker(MessageBrokerRegistry registry) {
        registry.enableSimpleBroker("/topic");
        registry.setApplicationDestinationPrefixes("/app");
    }
}
registerStompEndpoints() 는 클라이언트가 서버에 연결할 수 있는 WebSocket 엔드포인트를 등록한다. 클라이언트는 /ws 에 접근하여 서버에 연결할 수 있다. SockJS 는 WebSocket이 지원되지 않는 환경에서도 연결을 유지할 수 있도록 한다. WebSocket 대신 Long Polling과 같은 HTTP 기반 Fallback을 사용한다.
configureMessageBroker() 는 메세지 브로커를 구성하여 클라이언트와 서버 간 메세지 교환을 처리한다. enableSimpleBroker("/topic") 은 /topic 경로를 사용하는 pub-sub 모델을 활성화한다. 클라이언트가 /topic 경로를 구독하면 해당 경로로 발행된 메세지를 받을 수 있다. setApplicationDestinationPrefixes("/app") 은 클라이언트가 서버로 메세지를 보낼 때 사용하는 경로의 접두사를 /app 으로 설정한다.
WebSocket 은 클라이언트와 서버 간 양뱡향 통신을 지원하는 프로토콜이고, STOMP 는 WebSocket 위에서 동작하는 애플리케이션 계층 프로토콜로 pub-sub 모델을 지원한다. SockJS 는 WebSocket이 지원되지 않는 환경에서도 잘 동작할 수 있도록 하는 기술이다.
1
2
3
4
5
6
7
8
9
10
11
12
13
14
15
16
17
18
19
20
21
22
23
24
25
26
27
28
29
30
31
32
33
@Controller
@RequiredArgsConstructor
@RequestMapping("/chat")
public class ChatController {
    private final ChatService chatService;

    // ...

    @PostMapping("/write-websocket")
    @ResponseBody
    public ResponseEntity<ChatDto.WriteMessageResponse> writeMessageWebSocket(@RequestBody ChatDto.WriteMessageRequest writeMessageRequest) {
        Chat chat = chatService.writeMessageWebSocket(writeMessageRequest.getName(), writeMessageRequest.getContent());

        return ResponseEntity.ok(
                ChatDto.WriteMessageResponse.builder()
                        .chat(chat)
                        .build()
        );
    }

    @GetMapping("/messages")
    @ResponseBody
    public ResponseEntity<ChatDto.MessagesResponse> messages(Long fromId) {
        return ResponseEntity.ok(
                ChatDto.MessagesResponse.builder()
                        .chats(chatService.getMessages(fromId))
                        .totalCount(chatService.getTotalCount())
                        .build()
        );
    }

    // ...
}
1
2
3
4
5
6
7
8
9
10
11
12
13
14
15
16
17
18
19
20
21
22
23
24
@Service
@RequiredArgsConstructor
public class ChatService {
    private final ChatRepository chatRepository;
    private final SseEmitters sseEmitters;
    private final SimpMessagingTemplate simpleMessagingTemplete;

    // ...

    @Transactional
    public Chat writeMessageWebSocket(String name, String content) {
        Chat chat = Chat.builder()
                .name(name)
                .content(content)
                .createDate(LocalDateTime.now())
                .build();

        simpleMessagingTemplete.convertAndSend("/topic/chat/writeMessage", chat);

        return chatRepository.save(chat);
    }

    // ...
}
SimpMessagingTemplate 는 Spring에서 제공하는 메세징 템플릿이다. STOMP 프로토콜을 통해 WebSocket을 통해 클라이언트에게 메세지를 전송한다. 목적지는 /topic/chat/writeMessage 이다. 클라이언트가 해당 경로를 구독하고 있다면 발행된 메세지를 실시간으로 받을 수 있다.
Client
1
2
3
4
5
6
7
8
9
10
11
12
13
14
15
16
17
18
19
20
21
22
23
24
25
26
27
28
29
30
31
32
33
34
35
<script src="https://cdnjs.cloudflare.com/ajax/libs/sockjs-client/1.6.1/sockjs.min.js"></script>
<script src="https://cdnjs.cloudflare.com/ajax/libs/stomp.js/2.3.3/stomp.min.js"></script>

<!-- ... -->
<script>
    // ...

    function Chat__writeMessage(form) {
        // ...

        // 서버에 메시지 전송
        fetchPost("/chat/write-websocket", {
            name: form.name.value,
            content: form.content.value,
        }).then(console.log);

        form.content.value = "";
        form.content.focus();
    }

    // ...

    Chat__loadMore(); // 초기 메세지 로드

    const socket = new SockJS("/ws");
    const StompClient = Stomp.over(socket);

    StompClient.connect({}, (frame) => {
        console.log("Connected: " + frame);
        StompClient.subscribe("/topic/chat/writeMessage", (data) => {
            console.log(data.body);
            Chat__loadMore();
        });
    });
</script>
먼저 SockJS, STOMP 라이브러리를 가져온다.
SockJS() 를 통해 /ws 엔드포인트에 WebSocket 연결을 시도한다. Stomp.over() 로 STOMP 클라이언트를 생성한다. 서버에 STOMP 연결을 요청하고, 연결이 성공되었다면 /topic/chat/writeMessage 경로를 구독한다.
동작 과정
📌 깃허브 링크
https://github.com/whqtker/practice_chat