[Spring Security] UsernamePasswordAuthenticationFilter
📌 개요
사용자가 자격 증명을 입력하면 어떤 과정을 거쳐 사용자를 인증하게 될까? 그 과정에 대해 알아보자.
📌 UsernamePasswordAuthenticationFilter이란?
UsernamePasswordAuthenticationFilter 는 보안 필터 중 하나로 POST 요청으로 들어온 자격 증명을 토대로 인증을 수행한다.
📌 자격 증명 요청 전송 ~ 인증
1
2
3
4
5
6
7
8
9
10
11
12
13
14
15
16
17
18
19
20
private void doFilter(HttpServletRequest request, HttpServletResponse response, FilterChain chain)
		throws IOException, ServletException {
	if (!requiresAuthentication(request, response)) {
		chain.doFilter(request, response);
		return;
	}
	try {
		Authentication authenticationResult = attemptAuthentication(request, response);

		// ...
	}
	catch (InternalAuthenticationServiceException failed) {
		this.logger.error("An internal error occurred while trying to authenticate the user.", failed);
		unsuccessfulAuthentication(request, response, failed);
	}
	catch (AuthenticationException ex) {
		// Authentication failed
		unsuccessfulAuthentication(request, response, ex);
	}
}
먼저 AbstractAuthenticationProcessingFilter 가 사용자 로그인 요청을 받는다. requiresAuthentication 메서드를 통해 해당 요청이 자신이 처리할 대상인지 확인한다. 아니라면 다음 체인에 동작을 넘긴다.
자신이 처리할 요청이라면 try 블록 내에서 attemptAuthentication 메서드를 호출한다.
1
2
3
4
5
6
7
8
9
10
11
12
13
14
15
16
@Override
public Authentication attemptAuthentication(HttpServletRequest request, HttpServletResponse response)
		throws AuthenticationException {
	if (this.postOnly && !request.getMethod().equals("POST")) {
		throw new AuthenticationServiceException("Authentication method not supported: " + request.getMethod());
	}
	String username = obtainUsername(request);
	username = (username != null) ? username.trim() : "";
	String password = obtainPassword(request);
	password = (password != null) ? password : "";
	UsernamePasswordAuthenticationToken authRequest = UsernamePasswordAuthenticationToken.unauthenticated(username,
			password);
	// Allow subclasses to set the "details" property
	setDetails(request, authRequest);
	return this.getAuthenticationManager().authenticate(authRequest);
}
attemptAuthentication 메서드는 추상 메서드로, 기본적으로 자식 클래스인 UsernamePasswordAuthenticationFilter 에서 오버라이딩하여 작성되어 있다.
1
2
3
if (this.postOnly && !request.getMethod().equals("POST")) {
	throw new AuthenticationServiceException("Authentication method not supported: " + request.getMethod());
}
UsernamePasswordAuthenticationFilter 는 POST 요청만 처리한다. 받은 요청이 POST 인지 먼저 확인한다.
1
2
3
4
String username = obtainUsername(request);
username = (username != null) ? username.trim() : "";
String password = obtainPassword(request);
password = (password != null) ? password : "";
이후 HttpServletRequest 객체에서 아이디와 비밀번호를 문자열로 추출한다.
1
2
UsernamePasswordAuthenticationToken authRequest = UsernamePasswordAuthenticationToken.unauthenticated(username,
		password);
추출한 아이디와 비밀번호를 토대로 인증되지 않은 상태의 Authentication 토큰을 생성한다.
1
setDetails(request, authRequest);
인증 요청에 부가적인 컨텍스트 정보를 담는다.
1
return this.getAuthenticationManager().authenticate(authRequest);
이후 인증 요청을 AuthenticationManager 에게 전달하고 authenticate 메서드를 통해 인증을 진행한다.
인증에 성공하면 인증이 완료된 Authentication 객체가 리턴되며, 실패 시 AuthenticationException 예외가 발생한다.
1
2
3
4
5
6
7
8
9
10
11
12
13
14
15
16
17
18
19
20
21
22
23
24
25
26
27
28
private void doFilter(HttpServletRequest request, HttpServletResponse response, FilterChain chain)
		throws IOException, ServletException {
	if (!requiresAuthentication(request, response)) {
		chain.doFilter(request, response);
		return;
	}
	try {
		Authentication authenticationResult = attemptAuthentication(request, response);
		if (authenticationResult == null) {
			// return immediately as subclass has indicated that it hasn't completed
			return;
		}
		this.sessionStrategy.onAuthentication(authenticationResult, request, response);
		// Authentication success
		if (this.continueChainBeforeSuccessfulAuthentication) {
			chain.doFilter(request, response);
		}
		successfulAuthentication(request, response, chain, authenticationResult);
	}
	catch (InternalAuthenticationServiceException failed) {
		this.logger.error("An internal error occurred while trying to authenticate the user.", failed);
		unsuccessfulAuthentication(request, response, failed);
	}
	catch (AuthenticationException ex) {
		// Authentication failed
		unsuccessfulAuthentication(request, response, ex);
	}
}
다시 돌아와서 인증이 성공되었다면 sessionStrategy.onAuthentication 을 통해 기존 세션을 무효화하고 새로운 세션을 발급한다. 이후 successfulAuthentication 를 호출하여 인증된 객체를 SecurityContextHolder 에 저장하고 successHandler를 호출한다.
실패하였다면 unsuccessfulAuthentication 를 호출하여 SecurityContextHolder 를 초기화하고 failureHandler 를 호출한다.
📌 인증 후
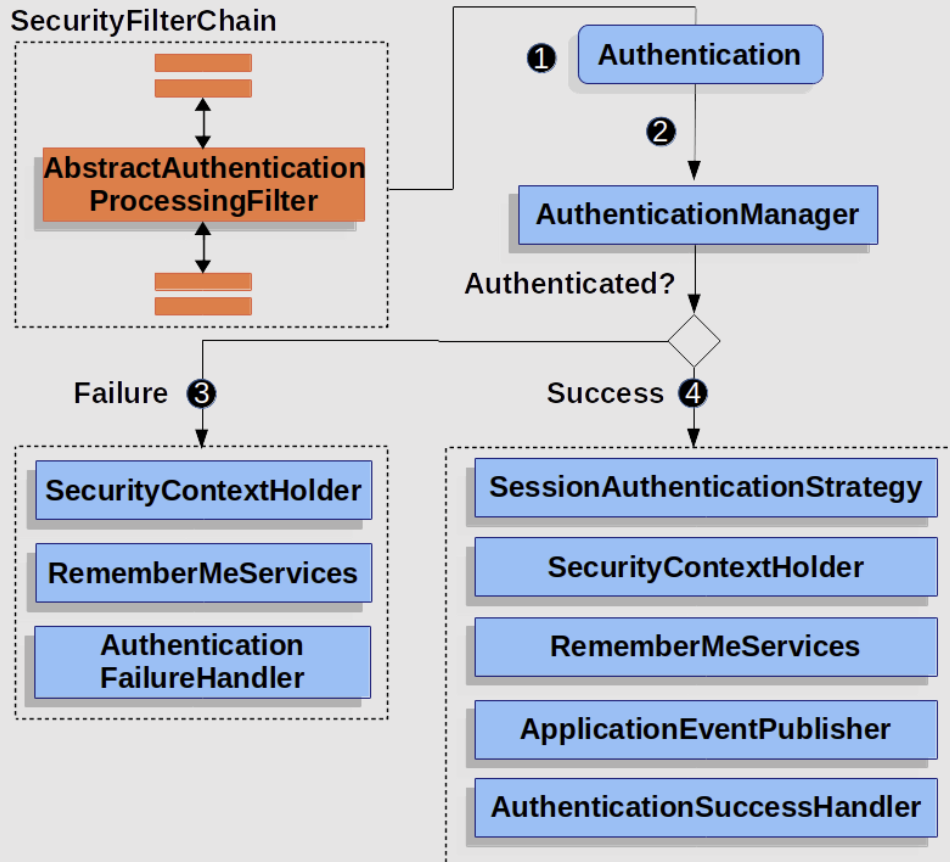
이번에는 플로우를 보고 다시 한 번 인증 과정에 대해 살펴보자. 인증 성공 또는 실패 후 그 다음 과정에 더 초점을 맞추어보자.
사용자가 자격 증명을 입력하고 서버에 요청을 보내면 SecurityFilterChain 내의 AbstractAuthenticationProcessingFilter 가 이를 가로챈다. 이후 Authentication 객체를 생성하고 인증 과정을 AuthenticationManager 에게 위임한다.
인증 성공
만약 사용자의 자격 증명이 유효하다고 판단하면 유효한 Authentication 객체를 리턴한다.
1
2
3
4
5
6
public interface SessionAuthenticationStrategy {

	void onAuthentication(Authentication authentication, HttpServletRequest request, HttpServletResponse response)
			throws SessionAuthenticationException;

}
이후 SessionAuthenticationStrategy 에서 기존 세션을 무효화하고 새로운 세션을 발급하는 동작을 수행한다.
1
2
3
4
5
6
7
8
9
10
11
12
13
14
15
protected void successfulAuthentication(HttpServletRequest request, HttpServletResponse response, FilterChain chain,
		Authentication authResult) throws IOException, ServletException {
	SecurityContext context = this.securityContextHolderStrategy.createEmptyContext();
	context.setAuthentication(authResult);
	this.securityContextHolderStrategy.setContext(context);
	this.securityContextRepository.saveContext(context, request, response);

	// ...

	rememberMeServices.loginSuccess(request, response, authResult);
	if (this.eventPublisher != null) {
		this.eventPublisher.publishEvent(new InteractiveAuthenticationSuccessEvent(authResult, this.getClass()));
	}
	this.successHandler.onAuthenticationSuccess(request, response, authResult);
}
그 다음 인증이 완료된 Authentication 객체를 SecurityContextHolder 에 저장한다. 이 순간부터 해당 사용자 정보는 세션에 보관되어 다른 곳에서 참조될 수 있게 된다.
만약 remember-me 기능이 활성화되었다면 rememberMeServices 의 loginSuccess 를 호출하여 remember-me 쿠키를 생성하고 전송한다.
이후 이벤트를 발행하여 로그인 성공 여부를 전달한다.
마지막으로 successHandler 의 onAuthenticationSuccess 가 수행된다.
인증 실패
1
2
3
4
5
6
7
8
9
protected void unsuccessfulAuthentication(HttpServletRequest request, HttpServletResponse response,
		AuthenticationException failed) throws IOException, ServletException {
	this.securityContextHolderStrategy.clearContext();

	// ...

	this.rememberMeServices.loginFail(request, response);
	this.failureHandler.onAuthenticationFailure(request, response, failed);
}
인증이 실패되었다면 SecurityContextHolder 를 초기화하고, 유효한 remember-me 쿠키가 있었다면 이를 무효화한다. 이후 failureHandler의 onAuthenticationFailure 메서드를 호출한다.